Difference between revisions of "How to Customize Media Center Master for First Run"
| Line 19: | Line 19: | ||
</blockquote></blockquote></blockquote> | </blockquote></blockquote></blockquote> | ||
| − | [[ | + | [[How to Configure the General Tab Settings]] |
| + | |||
| − | |||
[[Main_Page#Media Center Master Reference Guide|Back to Main Page - Contents]] | [[Main_Page#Media Center Master Reference Guide|Back to Main Page - Contents]] | ||
| Line 53: | Line 53: | ||
[[Main_Page#How to Configure the General Tab Settings|Back to top]] | [[Main_Page#How to Configure the General Tab Settings|Back to top]] | ||
| − | |||
| − | |||
| + | |||
| + | |||
| + | |||
| + | [[How to Configure the Download Parser Tab Settings]] | ||
[[How to Configure the Download Parser Tab Settings - Transparent Effect]] | [[How to Configure the Download Parser Tab Settings - Transparent Effect]] | ||
| − | + | ||
| + | |||
| + | [[How to Configure the uTorrent Tab Settings]] | ||
| + | |||
| + | |||
| + | |||
[[Main_Page#Media Center Master Reference Guide|Back to Main Page - Contents]] | [[Main_Page#Media Center Master Reference Guide|Back to Main Page - Contents]] | ||
| Line 175: | Line 182: | ||
[[Main_Page#How to Configure the uTorrent Tab Settings|Back to top]] | [[Main_Page#How to Configure the uTorrent Tab Settings|Back to top]] | ||
| − | + | ||
| + | |||
| + | |||
| + | [[How to Auto-Start Media Center Master After a Boot-up]] | ||
| + | |||
| + | |||
| + | |||
| + | |||
[[Main_Page#Media Center Master Reference Guide|Back to Main Page - Contents]] | [[Main_Page#Media Center Master Reference Guide|Back to Main Page - Contents]] | ||
| Line 198: | Line 212: | ||
[[Main_Page#How to Auto-Start Media Center Master After a Boot-up|Back to top]] | [[Main_Page#How to Auto-Start Media Center Master After a Boot-up|Back to top]] | ||
| − | + | ||
| + | |||
| + | |||
| + | [[How to Set Scan Folder]] | ||
| + | |||
| + | |||
| + | |||
| + | |||
[[Main_Page#Media Center Master Reference Guide|Back to Main Page - Contents]] | [[Main_Page#Media Center Master Reference Guide|Back to Main Page - Contents]] | ||
| Line 219: | Line 240: | ||
[[Main_Page#How to Set Scan Folder|Back to top]] | [[Main_Page#How to Set Scan Folder|Back to top]] | ||
| − | + | ||
| + | |||
| + | |||
| + | [[How to Configure the Downloader Tab Settings]] | ||
| + | |||
| + | |||
| + | |||
| + | |||
[[Main_Page#Media Center Master Reference Guide|Back to Main Page - Contents]] | [[Main_Page#Media Center Master Reference Guide|Back to Main Page - Contents]] | ||
| Line 279: | Line 307: | ||
[[Main_Page#How to Configure the Downloader Tab Settings|Back to top]] | [[Main_Page#How to Configure the Downloader Tab Settings|Back to top]] | ||
| − | + | ||
| + | |||
| + | |||
| + | [[How to Add a New TV Series]] | ||
| + | |||
| + | |||
| + | |||
| + | |||
[[Main_Page#Media Center Master Reference Guide|Back to Main Page - Contents]] | [[Main_Page#Media Center Master Reference Guide|Back to Main Page - Contents]] | ||
Revision as of 19:00, 6 August 2011
Installation Notes - read before installing.
For users who have installed Media Center Master previously, and are having problems, it is suggested to completely remove Media Center Master, using the uninstaller, delete the hidden user files/folders, and delete the registry entries. Reinstall, starting with the "Installation Notes, read before installing. These guides are written with the intent of Media Center Master to be installed on the system hard drive (C:\) in the same computer uTorrent is installed on.
Screen shot examples are taken from a Windows XP Operating System.
- Where major differences between operating systems occur; screen shots from a Windows 7 Operating System are included.
- The changes shown in this guide will optimize Media Center Master for the first time run, and
- Complete the integrating of Media Center Master with uTorrent.
How to Configure the General Tab Settings
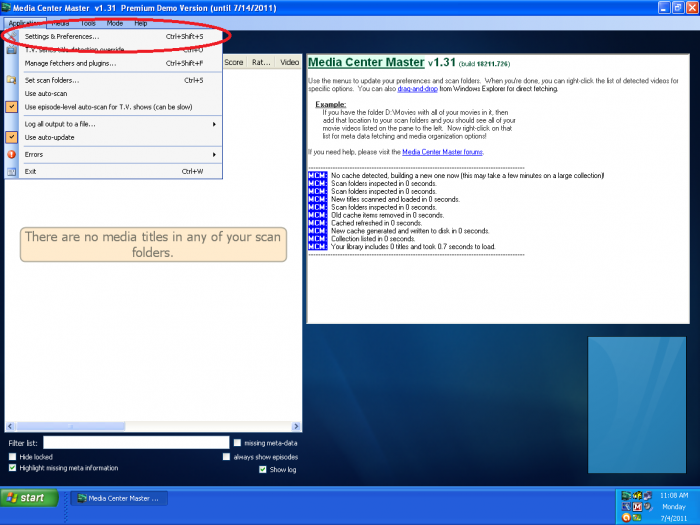
Step 1 - Open "Media Center Master - Settings & Preferences" window through the "Application" menu.
- These changes to the time frames for automation will prevent Media Center Master from running automated processes during the configuration set-up.
- At the end of this guide, some of the time frames will be changed to configure and start the first run test.
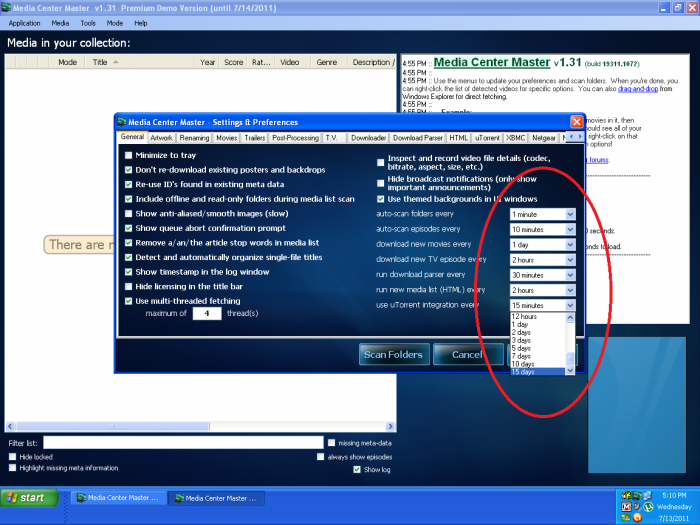
Step 2a - In the "General" tab settings:
- Tick the "pull down menu" buttons (∨),
- Scroll down to, and select "15 days",
- On all of the time frames for automation;
- "auto-scan folders every,"
- "auto-scan episodes every,"
- "download new movies every,"
- "download new TV episode every,"
- "run download parser every,"
- "run new media list (HTML) every,"
- "use uTorrent integration every."
Step 2b - Click on the "Save" button:
- To save changes to Media Center Master's registry key, and
- To activate the new settings.
How to Configure the Download Parser Tab Settings
How to Configure the Download Parser Tab Settings - Transparent Effect
How to Configure the uTorrent Tab Settings
***** Disclaimer -- read this before using Torrent Downloader *****
Step 1 - Leave Media Center Master with the "Setting & Preferences" window open, and do the following:
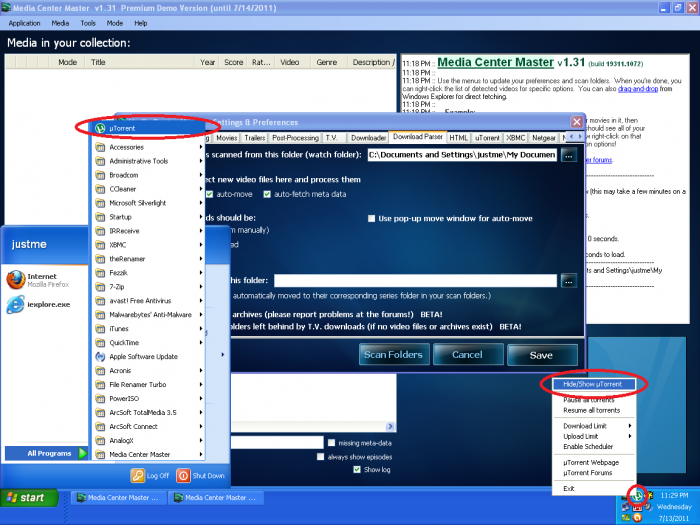
- Open the uTorrent Program through the "Start" button, then "All Programs."
- Right click the uTorrent icon, bottom right of screen, click on "Hide/Show uTorrent" to open uTorrent window.
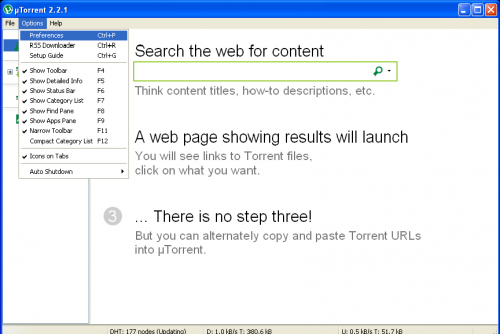
Step 2 - Open the "Preferences" window thru the Options Menu.
Step 3 - With the "Preferences" window open do the following:
- Click on "Connection" in the list on the left,
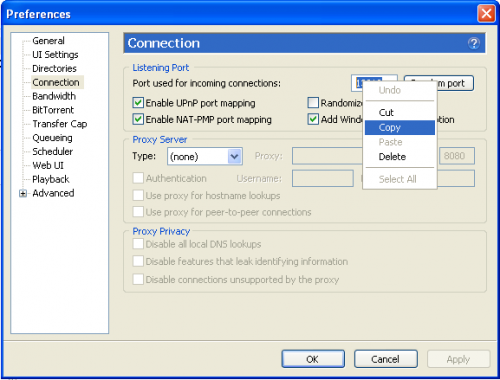
- Select and copy the port location listed for "Port used for incoming connections:"
This is the first step in a three (3) part outlined process, to enable, configure, then set the connection for a communication link to Media Center Master and uTorrent for the integration feature.
- Issues with The "WebUI I.P. or hostname:" data entry field
- The "WebUI I.P. or hostname:" data entry field is for an external communication link to:
- Connect Media Center Master to;
- Another computer in a network, or
- Another computer in a different network, having
- uTorrent installed.
- The WebUI I.P. or hostname used in these guides is "localhost" (without quotes), because:
- uTorrent is installed
- On "this computer" (i.e., localhost)
- With Media Center Master.
- A substitution for "localhost" could be
- The I.P. address (e.g., 192.168.0.108), or
- The "Computer Name" for
- "This computer" with
- Media Center Master and
- uTorrent installed.
- Although leaving the "WebUI I.P. or hostname:" data entry field blank,
- May work at times,
- It should contain one (1) of the three (3) options from above to
- Prevent errors, and
- Conflicts.
- "localhost" is chosen in these guides, because:
- It is suitable for all new users of Media Center Master.
- It eliminates
- Extra steps, and
- Extra explanations to
- Identify a user's:
- I.P. address, or
- "Computer Name".
- Issues with The "port:" data entry field
- The port number being pasted into Media Center Master, was determined by uTorrent.
- uTorrent picked an unused port, at random,
- During it's installation set-up.
Step 4a - Tick one of the two "Task Bar" buttons for Media Center Master, located at the bottom of your screen, to; Switch back to Media Center Master - "Setting & Preferences" window, leaving uTorrent with the "Preferences" window open, and do the following:
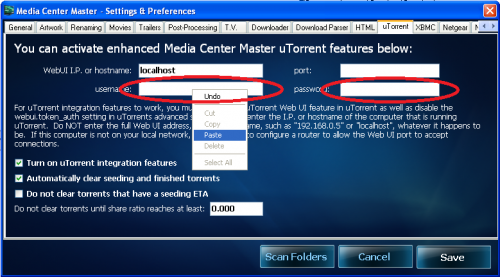
- Change views to the "uTorrent" tab settings,
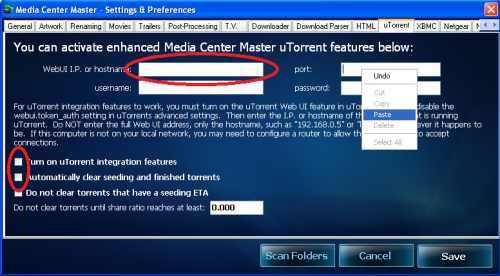
- Paste the port location from uTorrent into the area for "port:,"
- Enter "localhost" (without quotes) in the area for "WebUI I.P. or hostname:,"
- Tick the check box for "Turn on uTorrent integration features,"
- Tick the check box for "Automatically clear seeding and finished torrents"
Step 4b - Switch back to uTorrent with the "Preferences" window open, leaving Media Center Master - "Setting & Preferences" window open, then choose option #1, or option #2.
- For uTorrent v3.0.0 users, continue to Step 4c.
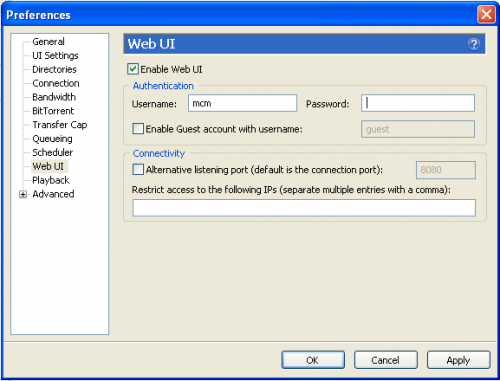
- For uTorrent v1.8 through v2.0 users, select "Web UI" in the list to the left, and continue with the step listed here;
- Select and copy the "Username:,"
- If you remember you password, continue to Step 5,
- If you lost, or forgot your password, re-enter the password, write it down, tick "Apply" to enter it into uTorrents user settings file, then continue to Step 5.
- Do not attempt to select and copy your password, as you will lose your username.
- Do not try to switch between the two programs to copy and paste the username, then copy and paste the password.
- Both programs will block the password out after it is entered, a copy/paste will not work.
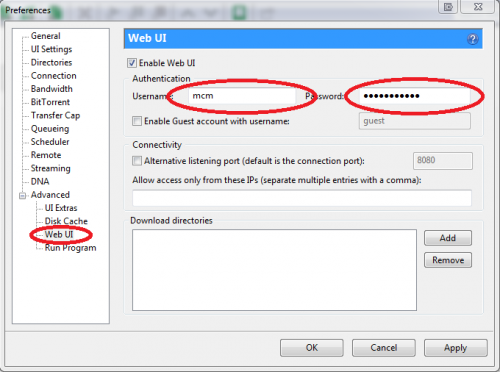
Step 4c - For uTorrent v3.0.0 users, expand the "Advanced" listing in the list to the left, select "Web UI", then do the following:
- Select and copy the "Username:,"
- If you remember you password, continue to Step 5,
- If you lost, or forgot your password, re-enter the password, write it down, tick "Apply" to enter it into uTorrents user settings file, then continue to Step 5.
- Do not attempt to select and copy your password, as you will lose your username.
- Do not try to switch between the two programs to copy and paste the username, then copy and paste the password.
- Both programs will block the password out after it is entered, a copy/paste will not work.
This is the second step in a three (3) part outlined process, to enable, configure, then set the connection for a communication link to Media Center Master and uTorrent for the integration feature.
- The user name and password entries are used for uTorrent's security protocol to gain access to it's Web UI feature.
- After clicking the "Save" button, the changes are saved to the different Media Center Master's registry key, string values.
- At this point, should there be no user errors, and no internal system conflicts of any kind, a communication link is set and established.
Step 5 - Switch back to Media Center Master - "Setting & Preferences" window, leaving uTorrent with the "Preferences" window open, and do the following:
- Paste the Username into "username:" input field,
- Type the Password into the "password: input field,
- Click the "Save" button to close the "Setting & Preferences" window.
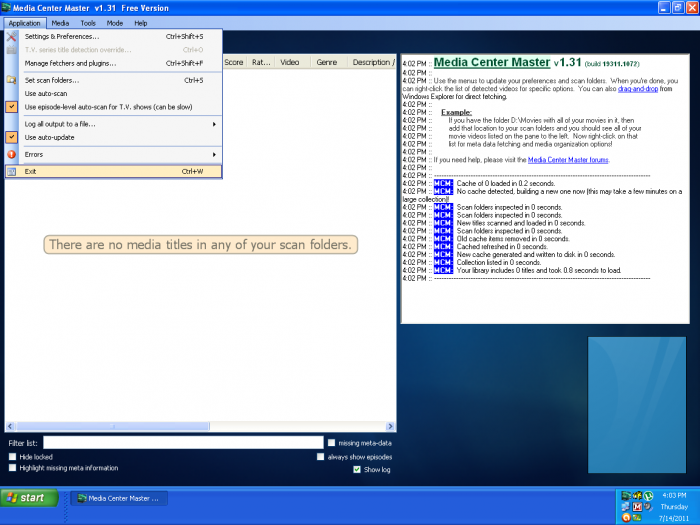
Step 6 - Exit Media Center Master through the "Application" menu.
How to Auto-Start Media Center Master After a Boot-up
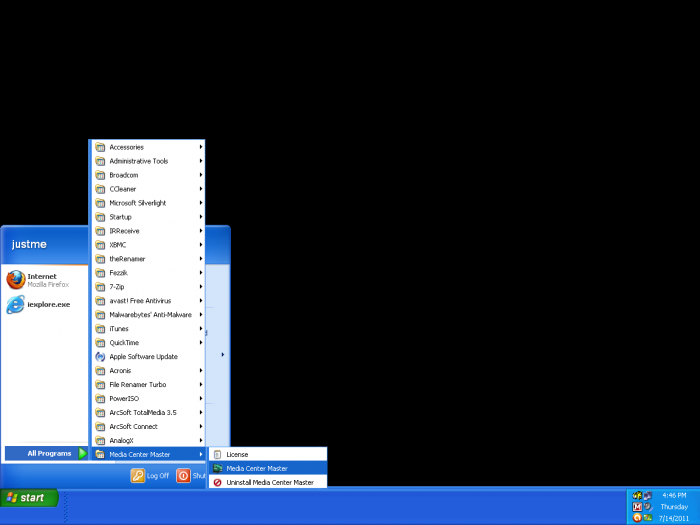
Step 1a - Navigate to the Media Center Master "shortcut", found through Start>All Programs>Media Center Master
- Right Click and hold the mouse button to drag,
- Continue to next step.
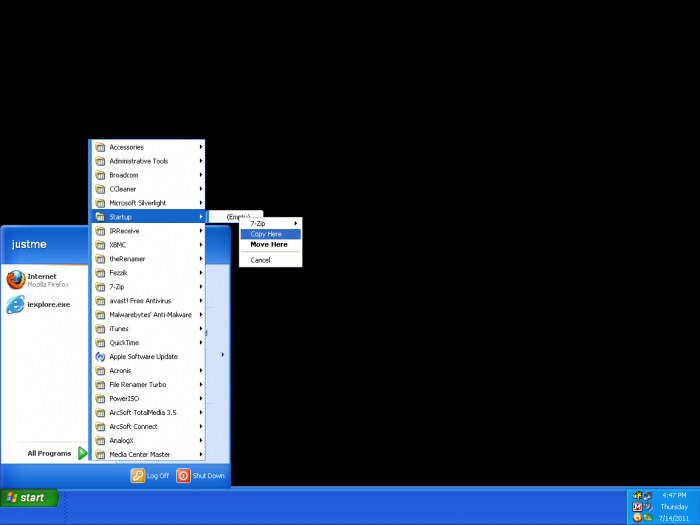
Step 1b - And drop a copy of the "shortcut" in the "Startup" folder.
- If the "Start" menu disappears before pasting, continue holding the right mouse button and hoover over the "Start" button until the menu pops up, while still holding the right mouse button move up through "All Programs" to "Startup", wait for a menu to appear, move over into the menu, let go of the right mouse button, and click "copy here" in the pop-up menu.
This is the third step in a three (3) part outline process, to enable, configure, then set the connection for a communication link to Media Center Master and uTorrent for the integration feature.
- This is an assurance step to prevent any possible conflicts which may occur without re-booting the system.
Step 2 - Reboot the system.
- Configuring the location for where Media Center Master will move downloads, meta-data, and image files to.
- This is, also, the location Media Center Master uses to scan an existing media collection.
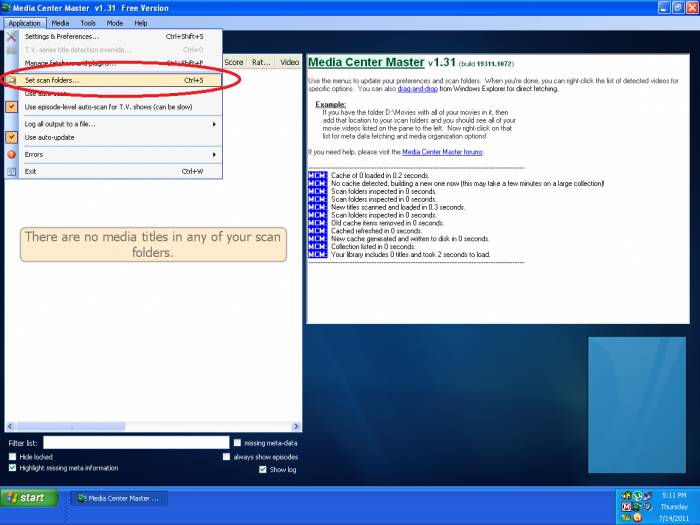
Step 1 - Open the "Set scan folders..." window through the "Application" menu.
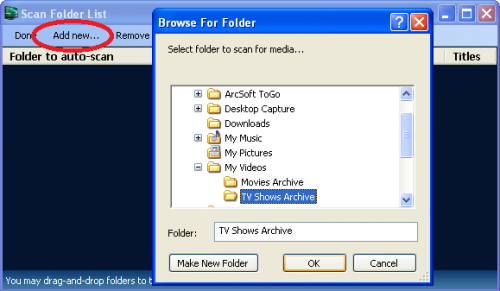
Step 2 - Tick the "Add new..." button to open the "Browse For Folder" window,
- Navigate to the Folder Structure created in the "How to set up a Folder Structure for Media Center Master" guide,
- Select the "TV Shows Archive" folder, then click the "OK" button,
- Close the "Scan Folder List" window by clicking on "Done," top left.
How to Configure the Downloader Tab Settings
All of the settings and configurations made, to this point, with Media Center Master, and uTorrent, to start and complete an automated process of downloading, renaming, moving completed torrents... are Basic, General, settings. The following steps outline detailed specifics to make an availability of an unknown, large, number of torrents in a pool to select from, and detailed specifics to set known limits, restricting, the number of torrents to fetch from the pool. These setting are what will enable a relatively short, and fast first run.
Step 1 - Open the Settings & Preferences" window through the "Application" menu.
This is the first of two (2) parts to: the specific settings of; the complete set-up configuration, which will ensure the downloading of a minimum of one (1) up to a maximum of five (5) TV Series Episodes during the first run.
- Not enabling "Allow torrents with archived files" option, removes any possible issues related to archived files.(*)
- Enabling the remaining four (4) "Allow torrents with ..." options,
- Not selecting a preferred video standard option,
- Not selecting a country bias, and
- Using all of the torrent sources:
- Provides for an unknown, large, torrent pool for selection.
- Allows Media Center Master to fetch any .torrent file for a TV episode that otherwise would be missed.
- Back dating the calender for one (1) month;
- Provides for a maximum of four (4), or five (5), weekly, episodes, depending on what day of the week the TV Series airs.
- Takes into consideration,
- Holidays, Special Showings of..., Special News/Current Event, and/or other minor breaks in a TV Series Season
- No torrent/s created for an episode, missed episode/s by torrent up-loader on vacation..., episode/s not made available for downloading for other reasons.
- New TV Series Season just starting only having one (1) aired episode during the chosen month span.
- Provides for a minimum of at least one (1), weekly, episode.
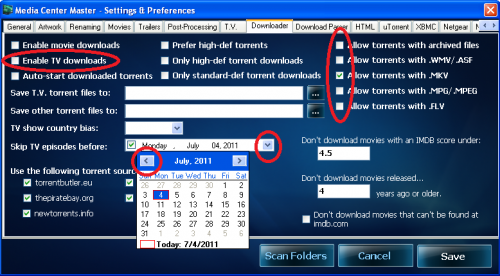
Step 2a - In the "Downloader" tab settings, do the following:
- Tick the check box for "Enable TV downloads,"
- Make sure the check box for "Allow torrents with archived files" is not checked,(*)
- Tick the check box for "Allow torrents with .WMV/>ASF,"
- Tick the check box for "Allow torrents with .MPG/MPEG,"
- Tick the check box for "Allow torrents with .FLV,"
- Tick the "pull down menu button" (∨) for "Skip TV episode before:" to get the pop-up calender,
- Tick the "back button" (<) on the calender to set the date back one month,
(*)Enabling the "Allow torrents with archived files" would require users to manually un-archive and remove the archived files. A feature for complete processing of archived files is in the "Beta" release phase, at the time of this writing. This option is used with the "Beta" feature option. Use of both options is intended for testing and to be used by advance users. This option and it's "Beta" featured option is not recommended for new users, or for the first run.
- This step configures the location of where Media Center Master will save a fetched .torrent file for uTorrent to read and set controls for a TV Series Episode download.
- After it is read, it is deleted by uTorrent.
- The second location, if left blank, will be configured by Media Center Master.
- By default, this will be the same location as listed in the "Save T.V. torrents files to:" field.
- This location will not be visible until the "Setting and Preferences" window is saved, closed, and reopened.
- The remaining options on this tab do not relate to TV Series, only, to Movies.
Step 2b - "Downloader" tab settings, continued
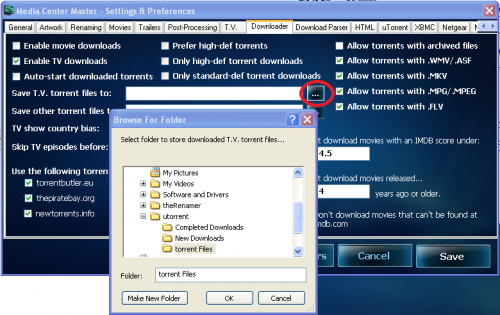
- Tick the "browse button" (…) for "Save T.V. torrent files to:," once to close the calender, and again to open the "Browse for Folder" window,
- Browse to the uTorrent Folder Structure, created in the "How to set up a Folder Structure for uTorrent" guide,
- Click on the "torrent Files" folder to select, then click "OK."
This is the second step of a two (2) part outlined process to define: the specific settings of; the complete set-up configuration, which will ensure the downloading of a minimum of one (1) up to a maximum of five (5) TV Series Episodes during the first run.
- Choose, only, one (1) TV Series.
- The main goal of this section is for the user to choose a TV Series which is popular to the viewing general public, thereby providing a good number of torrents in the availability pool for downloading during the test run.
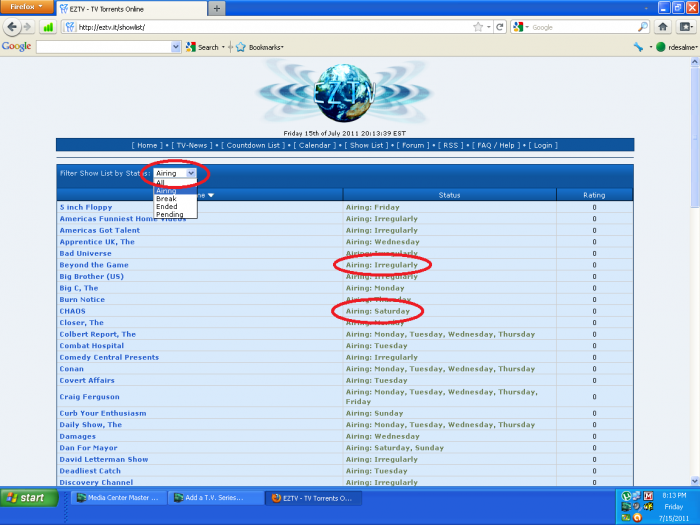
Step 1 - Before configuring Media Center Master to add a new TV Series to the collection, it is important for the user to know the correct name and spelling of a current airing TV Series with new episodes being shown weekly. A good place to make sure of this is to visit the EZTVShow List page.
- Begin with changing the "Filter Show List by Status:" to "Airing" with the "pull down menu" button (∨), to get the current airing TV Series.
- Pay close attention to the "Status" of the shows, "Airing: Irregularly" or "Airing:..."
- Pick a TV Series, making sure it is an "Airing:..." series.
- Highlight the complete name with the left mouse button to select it for copy and pasting into Media Center Master.
- Return to Media Center Master
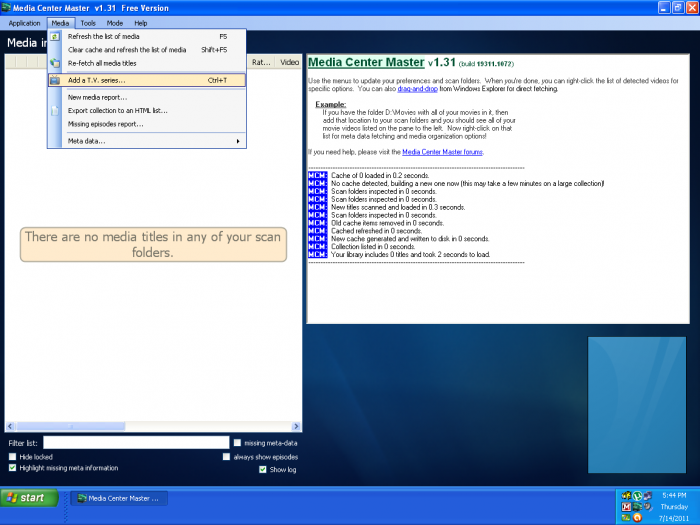
Step 2 - Open the "Add a T.V. series..." window through the "Media" menu.
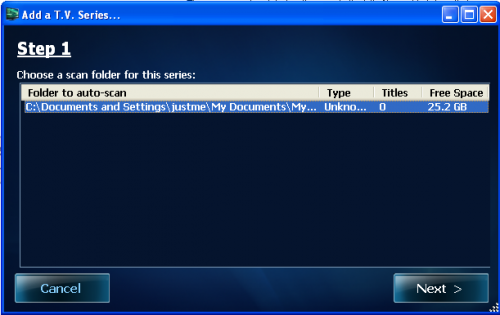
Step 3 - Click on the single listing, to select and highlight the "Folder to auto-scan" (TV Show Archive folder location), click "Next."
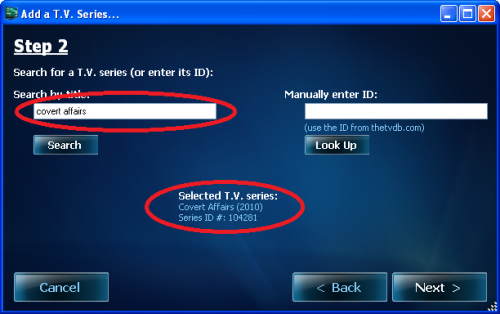
Step 4 - The name for the TV Series used in the this example, Covert Affairs, is used for demonstration purposes, only. The user should not use it for a first run testing.
- Paste the name of the chosen TV Series selected above into the "Search by title:" blank area,
- Click the "Search" button, after a few seconds, the chosen TV Series information should show in the "Selected T.V. series:" area,
- If the TV Series is listed, click the "Next" button then continue to Step 5.
- If the TV Series does not show up, go back to Step 1, pick a different show, and repeat Steps 2 and 3.
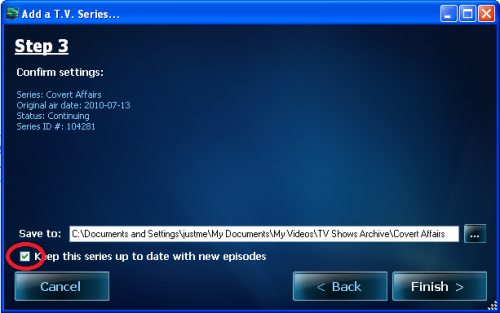
Step 5 - Assuming all of the data provided to the internet sites used for this step is up to date, there should be a "Confirm Settings:" listing showing "Status: Continuing" for the selected show.
- The check box for "Keep this series up to date with new episodes" should have a check in it.
- If the check is present, click the "Finish" button to close the "Add a T.V. Series..." window and continue to Step 6.
- If the check is not present, go back to Step 1, pick a different show, and repeat Steps 2 - 4.
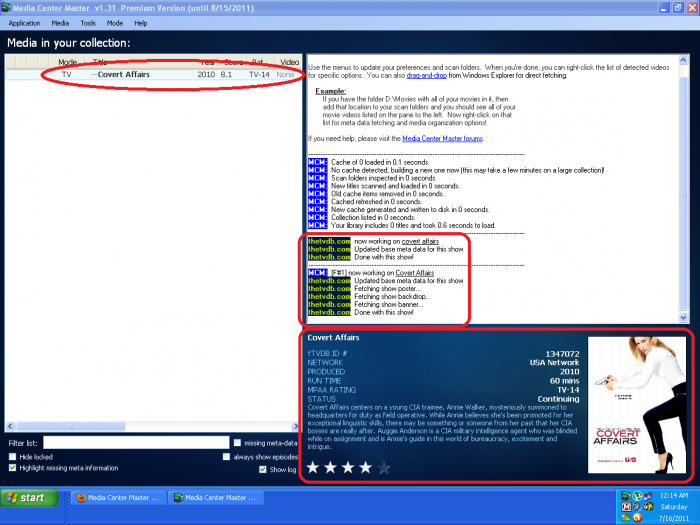
Step 6 - There should now be an entry added to the "Media in your collection:"
- At the top, left, the name of the selected show with some date related to it is shown.
- In the middle, right, the log shows the processes of what Media Center Master did, during the adding of the new TV Series.
- At the bottom, right, there is a graphic representation of the data fetched by Media Center Master for the new TV Series.


