

Main Page
Media Center Master Reference Guide
This is a work in progress, please be patient.
Media Center Master's Wiki Editing Guide
Contents
- 1 Media Center Master Reference Guide
- 2 Installing Media Center Master
- 2.1 Installation Notes - read, before installing
- 2.2 Preliminary Installation Guides
- 2.3 How to Install Media Center Master
- 2.4 How to Customize Media Center Master for First Run
- 2.4.1 How to Configure the General Tab Settings
- 2.4.2 How to Configure the Download Parser Tab Settings
- 2.4.3 How to Configure the uTorrent Tab Settings
- 2.4.4 How to Auto-Start Media Center Master After a Boot-up
- 2.4.5 How to Set Scan Folder
- 2.4.6 How to Configure the Downloader Tab Settings
- 2.4.7 How to Add a New TV Series
- 2.5 How to Start the First Run
- 3 Technical Guides to Features
- 4 Preparing for a Fresh Re-install of Media Center Master
- 4.1 How to Remove Media Center Master for a Fresh Re-Install
- 4.2 Additional Areas to Check Before Doing a Fresh Re-Install
Introduction
Media Center Master is a powerful, multipurpose, front-end interface that automates the organizing of video files, meta-data files, and image files for a media collection. It supports several Media Center applications and products, XBMC, Popcorn Hour, Windows Media Center, Media Browser... At it's core is a meta fetcher, the most important feature of the "Free License" version, which handles the processing of video related text and image files. Using a "Premium License" version with “uTorrent,” a BitTorrent Client, provides the user complete management of downloading TV Series Episodes and/or Movies, including the removal of; completed seeding downloads, completed .torrent files and data from the uTorrent GUI. Additional features of the "Premium License" version provides downloading of Theatrical Trailers, and Subtitles.
The only requirement necessary for an installation of Media Center Master is the Microsoft .NET Framework 3.5 with Service Pack 1 be pre-installed.
For most users, downloading and installing Media Center Master is a straightforward task. Although, Media Center Master installs with a set of default options, there are however several options left for the user to configure, depending on the set-up used.
The installation guides are written with an intent the user has an interest in creating a media collection from scratch, has some knowledge and experience with BitTorrents. The Main focus of the installation guides is to complete a successful first run, test, by:
- Preparing for,
- Installing, and
- Configuring
- An instance of Media Center Master integrated with
- An instance of uTorrent
- To automatically;
- Create a TV Series folder,
- Create season folder/s,
- Download, rename, and move
- Episodes, related text, and image files to
- Corresponding folders,
- Located on the system hard drive of a computer.
To reduce errors with a first time configuration set-up for all users of Media Center Master, the installation guides will not include instructions on how to set configurations for downloading Movies, Trailers, or Actors/Cast/Crew Members Thumbnails..., nor will there be any information about preparing and/or adding an existing media collection to Media Center Master. There will be no instructions given for networking/interfacing a media collection with any Media Center programs or products (e.g., Windows Media Center, MediaPortal, MediaBrowser, Popcorn Hour, or XBMC). These items require, separate, individualized preparations and customized user settings.
All of the installation guides are written for a new user of Media Center Master using a Premium License Version. Users wishing the use these guides with a Free Version may also use them, as limited by the license restrictions. These guides are written as a fundamental building block in the beginning sections, by condensing and simplifying the actual processing actions of Media Center Master's operations . As a user gets deeper into the installation guides, more of the technical processes are revealed, and the user becomes better prepared for other sections of this reference guide.
Installing Media Center Master
The intended purpose of this section is for it to be used as a complete manual for a first time installation of Media Center Master. Starting with the "Installation Notes" and finishing with a successful first run.
Installation Notes - read, before installing
Installation Notes - read, before installing
Preliminary Installation Guides
Preliminary Installation Guides
How to Install Media Center Master
How to Install Media Center Master
Installation Notes - read before installing.
For users who have installed Media Center Master previously, and are having problems, it is suggested to completely remove Media Center Master, using the uninstaller, delete the hidden user files/folders, and delete the registry entries. Reinstall, starting with the "Installation Notes, read before installing. These guides are written with the intent of Media Center Master to be installed on the system hard drive (C:\) in the same computer uTorrent is installed on.
- Screen shot examples are taken from a Windows XP Operating System.
- Where major differences between operating systems occur; screen shots from a Windows 7 Operating System are included.
Step 1 - The installer for Media Center Master can be obtained through the Downloads Section link located on the top of the Media Center Master website.
- The most current version will be listed as the third listing under the Topics Heading.
- Click the Version listed to be redirected to the Downloading page.

Step 2 - Click on the installer you wish to download, and save it to a location on your computer.

Step 3 - After it has completed downloading, navigate to the downloaded file,
- Click on the setup.exe file to begin installing Media Center Master.

Step 4 - After it has completed, make sure the check box for "Start Media Center Master" is checked, then
- Click the "Finish" Button to start Media Center Master.

Step 5 - During the first run of Media Center Master, the program will "Auto-Update" several files.

Step 6 - After the "Auto-Update" finishes, Media Center Master will open along the first run "Broadcast Announcement."

Step 7 - After reading the announcement, close it out, leaving Media Center Master open.
How to Customize Media Center Master for First Run
Installation Notes - read before installing.
For users who have installed Media Center Master previously, and are having problems, it is suggested to completely remove Media Center Master, using the uninstaller, delete the hidden user files/folders, and delete the registry entries. Reinstall, starting with the "Installation Notes, read before installing. These guides are written with the intent of Media Center Master to be installed on the system hard drive (C:\) in the same computer uTorrent is installed on.
Screen shot examples are taken from a Windows XP Operating System.
- Where major differences between operating systems occur; screen shots from a Windows 7 Operating System are included.
- The changes shown in this guide will optimize Media Center Master for the first time run, and
- Complete the integrating of Media Center Master with uTorrent.
How to Configure the General Tab Settings
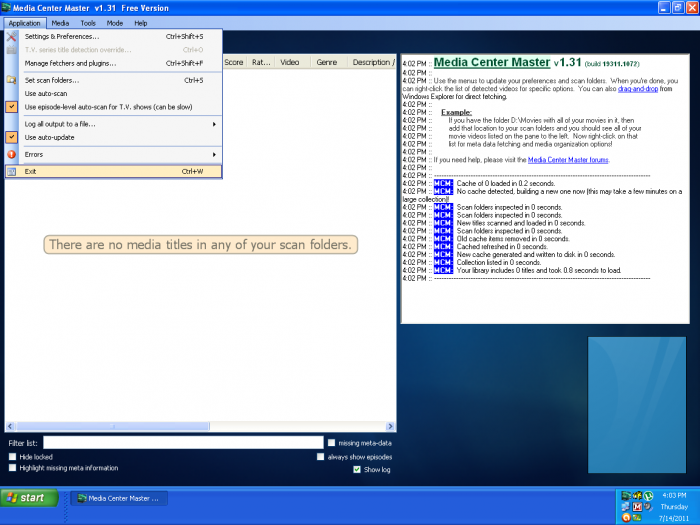
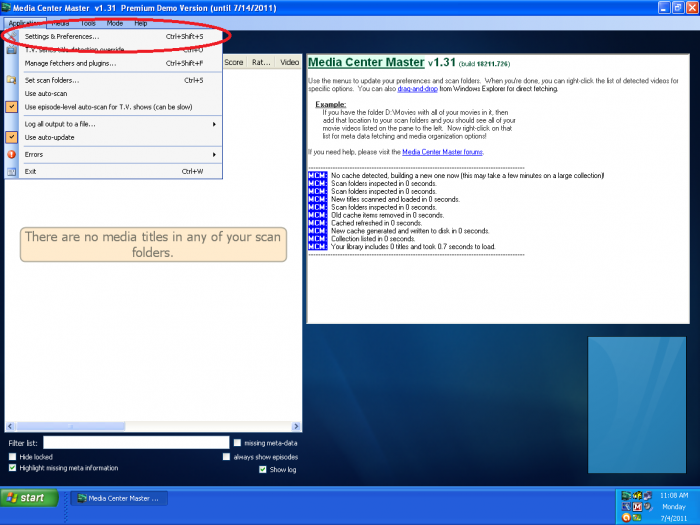
Step 1 - Open "Media Center Master - Settings & Preferences" window through the "Application" menu.

- These changes to the time frames for automation will prevent Media Center Master from running automated processes during the configuration set-up.
- At the end of this guide, some of the time frames will be changed to configure and start the first run test.
Step 2a - In the "General" tab settings:
- Tick the "pull down menu" buttons (∨),
- Scroll down to, and select "15 days",
- On all of the time frames for automation;
- "auto-scan folders every,"
- "auto-scan episodes every,"
- "download new movies every,"
- "download new TV episode every,"
- "run download parser every,"
- "run new media list (HTML) every,"
- "use uTorrent integration every."

Step 2b - Click on the "Save" button:
- To save changes to Media Center Master's registry key, and
- To activate the new settings.
How to Configure the Download Parser Tab Settings
Step 1 - Re-open "Media Center Master - Settings & Preferences" window through the "Application" menu.
- Enabling the detection process for renaming, meta-data fetching, and for moving into the TV Series Archive.
- Configures the location where Media Center Master will monitor to look for completed downloads.
Step 2 - In the "Download Parser" tab settings,
- Tick all, four (4), of the check boxes associated with "Automatically detect new video files here and process them",
- Tick the "browse button" (…) for "Completed downloads scanned from this folder (watch folder):" to open the "Browse for Folder" window,
- Browse to the uTorrent Folder Structure, created in the "How to set up a Folder Structure for uTorrent" guide,
- Click on the "Completed Downloads" folder to select, then click "OK."
- Continue to next guide, "How to Configure Sitting for Transparent Effect."

How to Configure the Settings for Transparent Effect
- This is the third step of three part outlined process to configuring settings for the transparent effect.
- Disabling the pop-up move window removes the required user acknowledgement to allow for auto-move.
Continued from Step 2 of the guide, "How to Configure the Download Parser Tab Settings."
- In the "Download Parser" tab settings,
- Tick the check box for "Use pop-up move window for auto-move" to remove the check mark.

How to Configure the uTorrent Tab Settings
***** Disclaimer -- read this before using Torrent Downloader *****
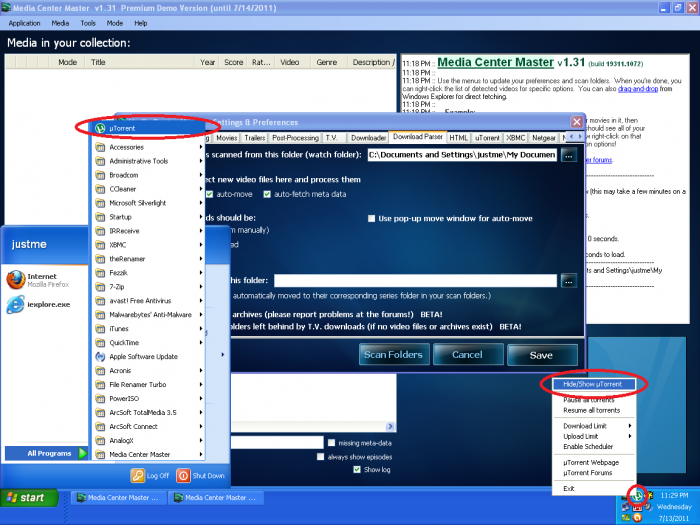
Step 1 - Leave Media Center Master with the "Setting & Preferences" window open, and do the following:
- Open the uTorrent Program through the "Start" button, then "All Programs."
- Right click the uTorrent icon, bottom right of screen, click on "Hide/Show uTorrent" to open uTorrent window.
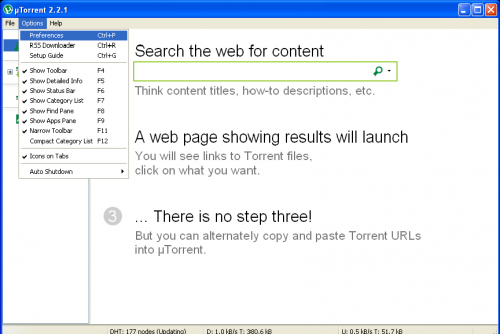
Step 2 - Open the "Preferences" window thru the Options Menu.
Step 3 - With the "Preferences" window open do the following:
- Click on "Connection" in the list on the left,
- Select and copy the port location listed for "Port used for incoming connections:"

This is the first step in a three (3) part outlined process, to enable, configure, then set the connection for a communication link to Media Center Master and uTorrent for the integration feature.
- Issues with The "WebUI I.P. or hostname:" data entry field
- The "WebUI I.P. or hostname:" data entry field is for an external communication link to:
- Connect Media Center Master to;
- Another computer in a network, or
- Another computer in a different network, having
- uTorrent installed.
- The WebUI I.P. or hostname used in these guides is "localhost" (without quotes), because:
- uTorrent is installed
- On "this computer" (i.e., localhost)
- With Media Center Master.
- A substitution for "localhost" could be
- The I.P. address (e.g., 192.168.0.108), or
- The "Computer Name" for
- "This computer" with
- Media Center Master and
- uTorrent installed.
- Although leaving the "WebUI I.P. or hostname:" data entry field blank,
- May work at times,
- It should contain one (1) of the three (3) options from above to
- Prevent errors, and
- Conflicts.
- "localhost" is chosen in these guides, because:
- It is suitable for all new users of Media Center Master.
- It eliminates
- Extra steps, and
- Extra explanations to
- Identify a user's:
- I.P. address, or
- "Computer Name".
- Issues with The "port:" data entry field
- The port number being pasted into Media Center Master, was determined by uTorrent.
- uTorrent picked an unused port, at random,
- During it's installation set-up.
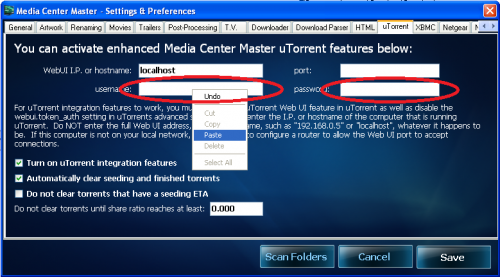
Step 4a - Tick one of the two "Task Bar" buttons for Media Center Master, located at the bottom of your screen, to; Switch back to Media Center Master - "Setting & Preferences" window, leaving uTorrent with the "Preferences" window open, and do the following:
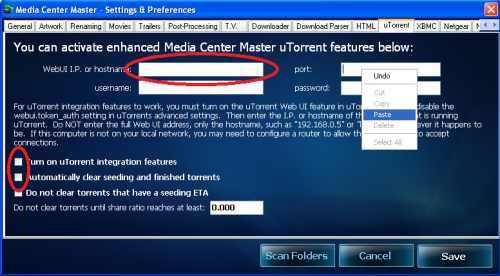
- Change views to the "uTorrent" tab settings,
- Paste the port location from uTorrent into the area for "port:,"
- Enter "localhost" (without quotes) in the area for "WebUI I.P. or hostname:,"
- Tick the check box for "Turn on uTorrent integration features,"
- Tick the check box for "Automatically clear seeding and finished torrents"
Step 4b - Switch back to uTorrent with the "Preferences" window open, leaving Media Center Master - "Setting & Preferences" window open, then choose option #1, or option #2.
- For uTorrent v3.0.0 users, continue to Step 4c.
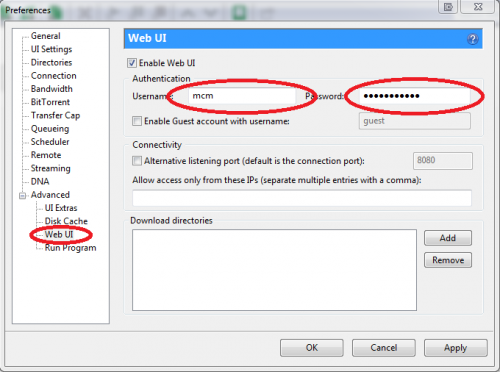
- For uTorrent v1.8 through v2.0 users, select "Web UI" in the list to the left, and continue with the step listed here;
- Select and copy the "Username:,"
- If you remember you password, continue to Step 5,
- If you lost, or forgot your password, re-enter the password, write it down, tick "Apply" to enter it into uTorrents user settings file, then continue to Step 5.
- Do not attempt to select and copy your password, as you will lose your username.
- Do not try to switch between the two programs to copy and paste the username, then copy and paste the password.
- Both programs will block the password out after it is entered, a copy/paste will not work.
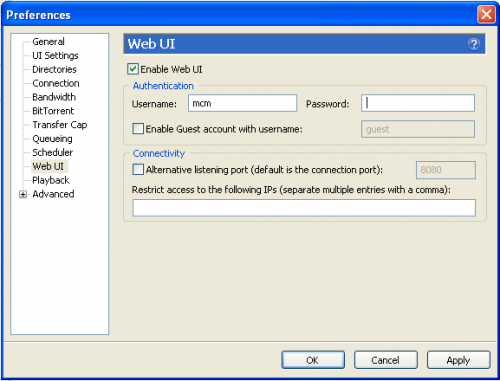
Step 4c - For uTorrent v3.0.0 users, expand the "Advanced" listing in the list to the left, select "Web UI", then do the following:
- Select and copy the "Username:,"
- If you remember you password, continue to Step 5,
- If you lost, or forgot your password, re-enter the password, write it down, tick "Apply" to enter it into uTorrents user settings file, then continue to Step 5.
- Do not attempt to select and copy your password, as you will lose your username.
- Do not try to switch between the two programs to copy and paste the username, then copy and paste the password.
- Both programs will block the password out after it is entered, a copy/paste will not work.
This is the second step in a three (3) part outlined process, to enable, configure, then set the connection for a communication link to Media Center Master and uTorrent for the integration feature.
- The user name and password entries are used for uTorrent's security protocol to gain access to it's Web UI feature.
- After clicking the "Save" button, the changes are saved to the different Media Center Master's registry key, string values.
- At this point, should there be no user errors, and no internal system conflicts of any kind, a communication link is set and established.
Step 5 - Switch back to Media Center Master - "Setting & Preferences" window, leaving uTorrent with the "Preferences" window open, and do the following:
- Paste the Username into "username:" input field,
- Type the Password into the "password: input field,
- Click the "Save" button to close the "Setting & Preferences" window.
Step 6 - Exit Media Center Master through the "Application" menu.
How to Auto-Start Media Center Master After a Boot-up
Step 1a - Navigate to the Media Center Master "shortcut", found through Start>All Programs>Media Center Master
- Right Click and hold the mouse button to drag,
- Continue to next step.
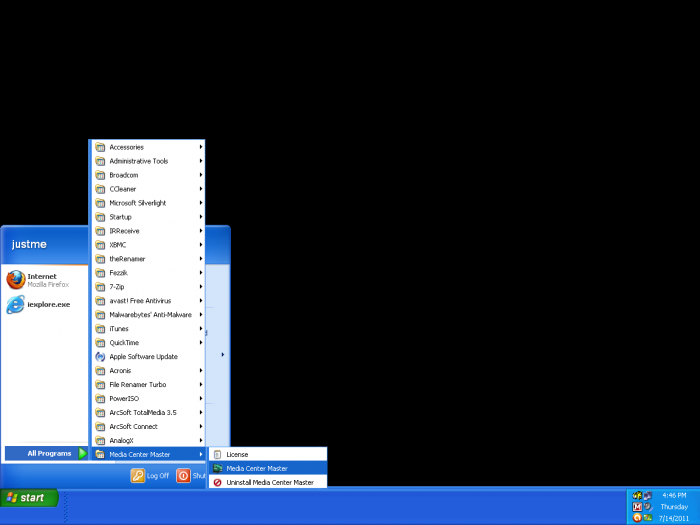
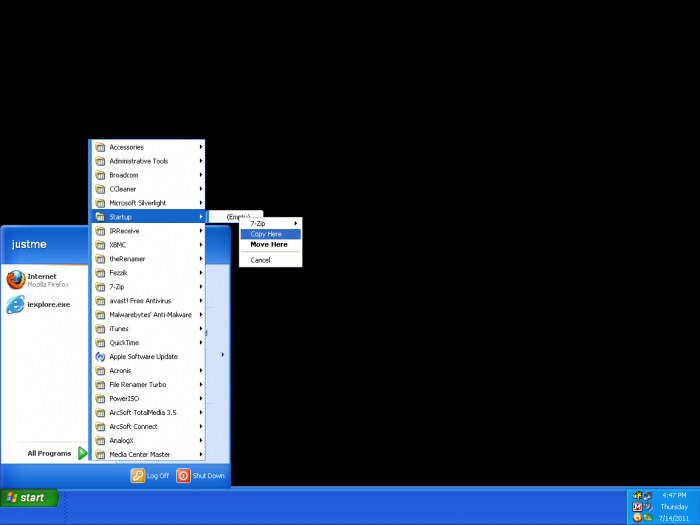
Step 1b - And drop a copy of the "shortcut" in the "Startup" folder.
- If the "Start" menu disappears before pasting, continue holding the right mouse button and hoover over the "Start" button until the menu pops up, while still holding the right mouse button move up through "All Programs" to "Startup", wait for a menu to appear, move over into the menu, let go of the right mouse button, and click "copy here" in the pop-up menu.
This is the third step in a three (3) part outline process, to enable, configure, then set the connection for a communication link to Media Center Master and uTorrent for the integration feature.
- This is an assurance step to prevent any possible conflicts which may occur without re-booting the system.
Step 2 - Reboot the system.
How to Set Scan Folder
- Configuring the location for where Media Center Master will move downloads, meta-data, and image files to.
- This is, also, the location Media Center Master uses to scan an existing media collection.
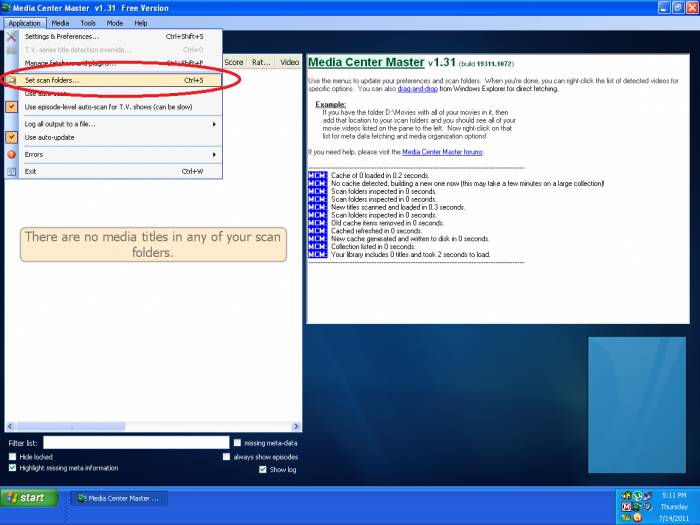
Step 1 - Open the "Set scan folders..." window through the "Application" menu.
Step 2 - Tick the "Add new..." button to open the "Browse For Folder" window,
- Navigate to the Folder Structure created in the "How to set up a Folder Structure for Media Center Master" guide,
- Select the "TV Shows Archive" folder, then click the "OK" button,
- Close the "Scan Folder List" window by clicking on "Done," top left.

How to Configure the Downloader Tab Settings
All of the settings and configurations made, to this point, with Media Center Master, and uTorrent, to start and complete an automated process of downloading, renaming, moving completed torrents... are Basic, General, settings. The following steps outline detailed specifics to make an availability of an unknown, large, number of torrents in a pool to select from, and detailed specifics to set known limits, restricting, the number of torrents to fetch from the pool. These setting are what will enable a relatively short, and fast first run.
Step 1 - Open the Settings & Preferences" window through the "Application" menu.
This is the first of two (2) parts to: the specific settings of; the complete set-up configuration, which will ensure the downloading of a minimum of one (1) up to a maximum of five (5) TV Series Episodes during the first run.
- Not enabling "Allow torrents with archived files" option, removes any possible issues related to archived files.(*)
- Enabling the remaining four (4) "Allow torrents with ..." options,
- Not selecting a preferred video standard option,
- Not selecting a country bias, and
- Using all of the torrent sources:
- Provides for an unknown, large, torrent pool for selection.
- Allows Media Center Master to fetch any .torrent file for a TV episode that otherwise would be missed.
- Back dating the calender for one (1) month;
- Provides for a maximum of four (4), or five (5), weekly, episodes, depending on what day of the week the TV Series airs.
- Takes into consideration,
- Holidays, Special Showings of..., Special News/Current Event, and/or other minor breaks in a TV Series Season
- No torrent/s created for an episode, missed episode/s by torrent up-loader on vacation..., episode/s not made available for downloading for other reasons.
- New TV Series Season just starting only having one (1) aired episode during the chosen month span.
- Provides for a minimum of at least one (1), weekly, episode.
Step 2a - In the "Downloader" tab settings, do the following:
- Tick the check box for "Enable TV downloads,"
- Make sure the check box for "Allow torrents with archived files" is not checked,(*)
- Tick the check box for "Allow torrents with .WMV/>ASF,"
- Tick the check box for "Allow torrents with .MPG/MPEG,"
- Tick the check box for "Allow torrents with .FLV,"
- Tick the "pull down menu button" (∨) for "Skip TV episode before:" to get the pop-up calender,
- Tick the "back button" (<) on the calender to set the date back one month,

(*)Enabling the "Allow torrents with archived files" would require users to manually un-archive and remove the archived files. A feature for complete processing of archived files is in the "Beta" release phase, at the time of this writing. This option is used with the "Beta" feature option. Use of both options is intended for testing and to be used by advance users. This option and it's "Beta" featured option is not recommended for new users, or for the first run.
- This step configures the location of where Media Center Master will save a fetched .torrent file for uTorrent to read and set controls for a TV Series Episode download.
- After it is read, it is deleted by uTorrent.
- The second location, if left blank, will be configured by Media Center Master.
- By default, this will be the same location as listed in the "Save T.V. torrents files to:" field.
- This location will not be visible until the "Setting and Preferences" window is saved, closed, and reopened.
- The remaining options on this tab do not relate to TV Series, only, to Movies.
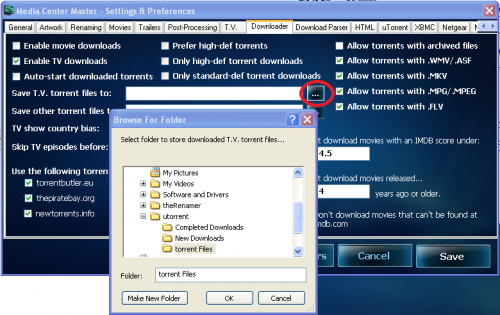
Step 2b - "Downloader" tab settings, continued
- Tick the "browse button" (…) for "Save T.V. torrent files to:," once to close the calender, and again to open the "Browse for Folder" window,
- Browse to the uTorrent Folder Structure, created in the "How to set up a Folder Structure for uTorrent" guide,
- Click on the "torrent Files" folder to select, then click "OK."
How to Add a New TV Series
This is the second step of a two (2) part outlined process to define: the specific settings of; the complete set-up configuration, which will ensure the downloading of a minimum of one (1) up to a maximum of five (5) TV Series Episodes during the first run.
- Choose, only, one (1) TV Series.
- The main goal of this section is for the user to choose a TV Series which is popular to the viewing general public, thereby providing a good number of torrents in the availability pool for downloading during the test run.
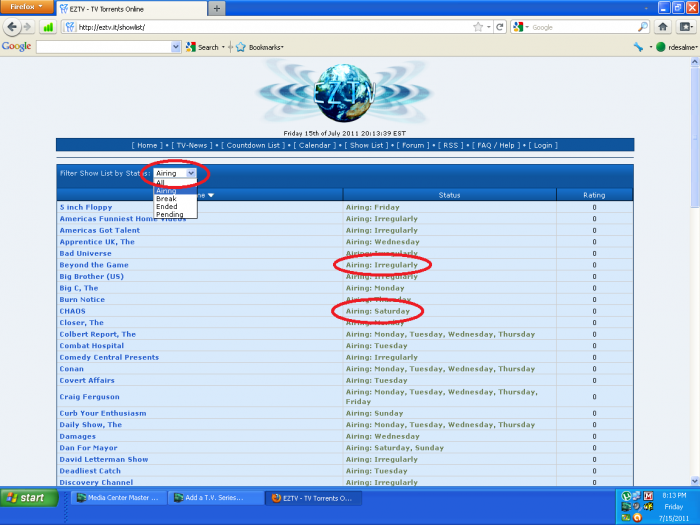
Step 1 - Before configuring Media Center Master to add a new TV Series to the collection, it is important for the user to know the correct name and spelling of a current airing TV Series with new episodes being shown weekly. A good place to make sure of this is to visit the EZTVShow List page.
- Begin with changing the "Filter Show List by Status:" to "Airing" with the "pull down menu" button (∨), to get the current airing TV Series.
- Pay close attention to the "Status" of the shows, "Airing: Irregularly" or "Airing:..."
- Pick a TV Series, making sure it is an "Airing:..." series.
- Highlight the complete name with the left mouse button to select it for copy and pasting into Media Center Master.
- Return to Media Center Master
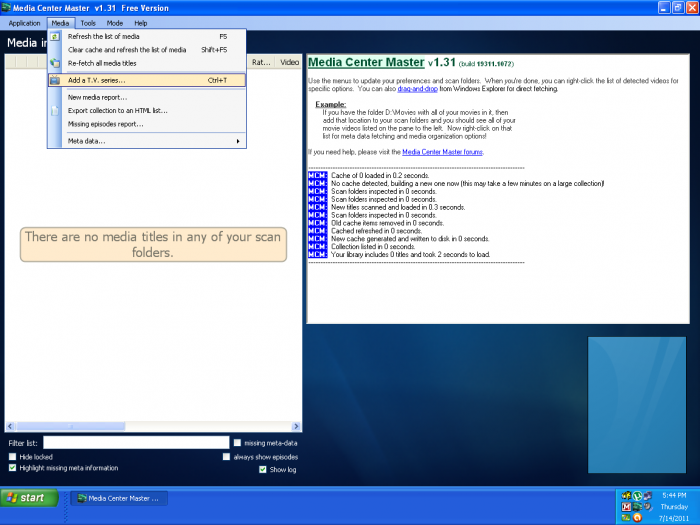
Step 2 - Open the "Add a T.V. series..." window through the "Media" menu.
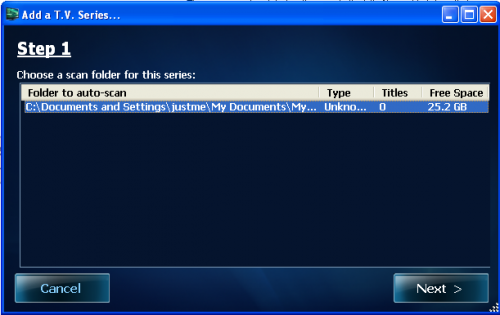
Step 3 - Click on the single listing, to select and highlight the "Folder to auto-scan" (TV Show Archive folder location), click "Next."
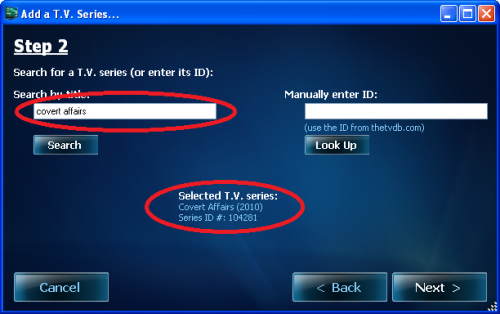
Step 4 - The name for the TV Series used in the this example, Covert Affairs, is used for demonstration purposes, only. The user should not use it for a first run testing.
- Paste the name of the chosen TV Series selected above into the "Search by title:" blank area,
- Click the "Search" button, after a few seconds, the chosen TV Series information should show in the "Selected T.V. series:" area,
- If the TV Series is listed, click the "Next" button then continue to Step 5.
- If the TV Series does not show up, go back to Step 1, pick a different show, and repeat Steps 2 and 3.
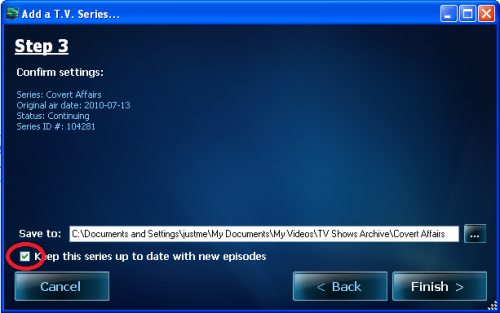
Step 5 - Assuming all of the data provided to the internet sites used for this step is up to date, there should be a "Confirm Settings:" listing showing "Status: Continuing" for the selected show.
- The check box for "Keep this series up to date with new episodes" should have a check in it.
- If the check is present, click the "Finish" button to close the "Add a T.V. Series..." window and continue to Step 6.
- If the check is not present, go back to Step 1, pick a different show, and repeat Steps 2 - 4.
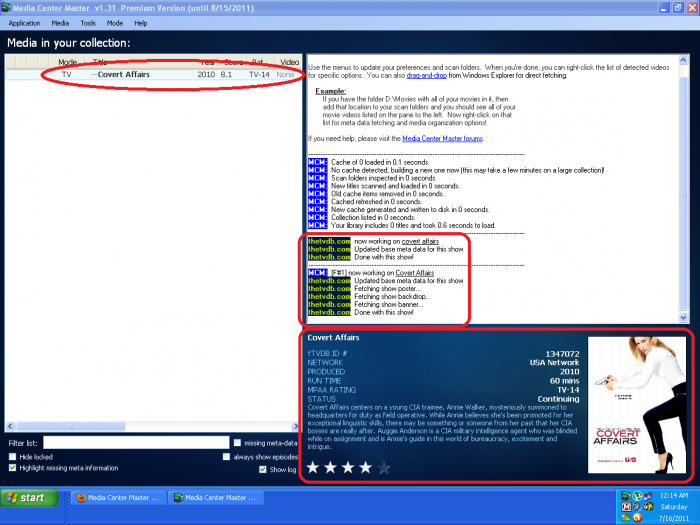
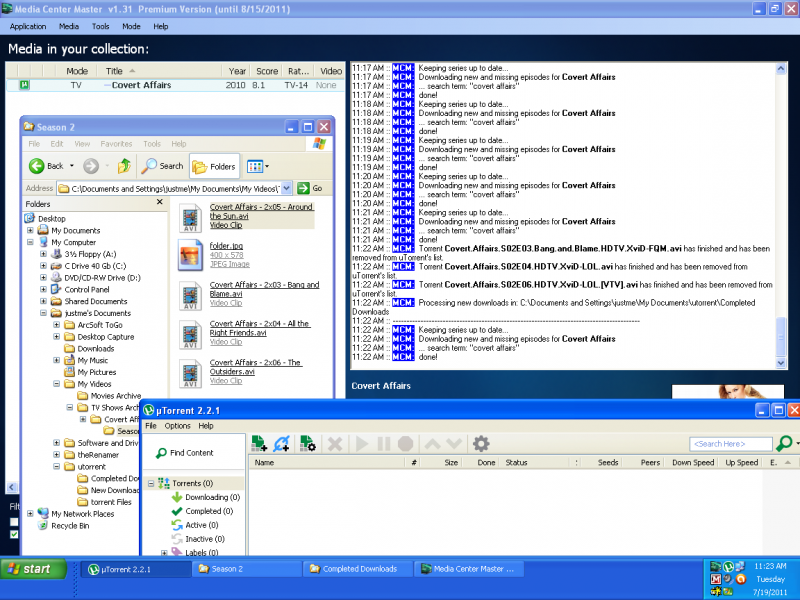
Step 6 - There should now be an entry added to the "Media in your collection:"
- At the top, left, the name of the selected show with some date related to it is shown.
- In the middle, right, the log shows the processes of what Media Center Master did, during the adding of the new TV Series.
- At the bottom, right, there is a graphic representation of the data fetched by Media Center Master for the new TV Series.
How to Start the First Run
- Do not use, this guide, unless, the user followed the Table of Contents, Section 2 - Installing Media Center Master with it's subsections, as a complete guide, without making any changes to the defined settings.
- Using these steps in any other manner will not reproduce what is shown in the examples.
- A "Real Time," "Real Life" scenario configuration will require changing, and/or adding new, settings to suit the user's preferences.
- The settings used in these guides to configure uTorrent and Media Center Master for the first run are for new users to get a base automated process up and running that can be customized, later.
- These guides provide information about: how the basic automation process works, which program is doing what processing, what is being processed, when the processes occur, and where the processing is taken place.
- This is shown through examples and explanations in the guides, to include; this guide, "How to Start the First Run," and the following guide, "How to Interpret the First Run."
- For some users, a simple change to the "Time Frames" for automation, may be the only requirement to reconfigure for a user's preferences.
- For other users, several of the settings configured in these guides may need to be changed, and/or additional changes may be required to options not included in these guides, in order to suit the user's preferences.
Step 1 - Open "Media Center Master - Settings & Preferences" window through the "Application" menu.
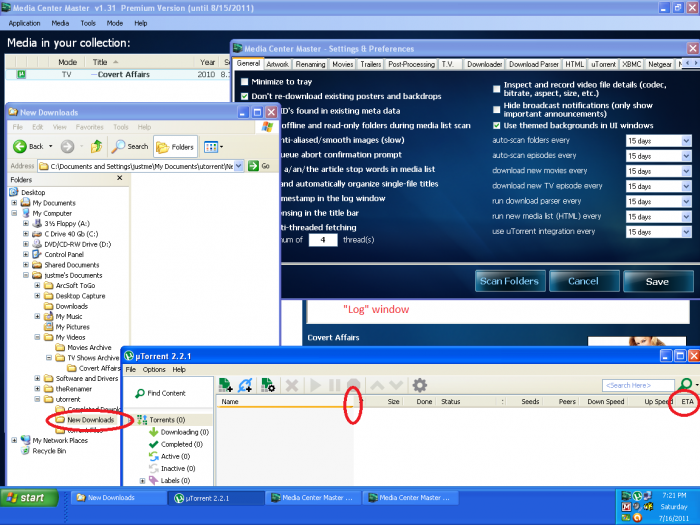
Step 2 - Create a desktop layout as show below, with Media Center Master, uTorrent and the Explorer windows. Attempt to get the window sizes and locations as close as possible. This will help in the next guide to follow the movements of the folders and files as they are passed from program to program and through the different folder structures. The processes will happen quickly at first and then vary in time as the processing takes place. The specific concerns to look for in sizing and location are:
- Media Center Master should be the far background window with the "Settings and Preferences" window at the top, right, just below the "Title" bar.
- Depending on the locations of the Folder Structures for Media Center Master and uTorrent, the Explorer window should not extend into Media Center Master's "Log" window (white area just above the TV Series name, "Covert Affairs"). It can extend the full height of the screen, from top to bottom. If it is impossible to show both Folder Structure locations, adjust the viewing panes for explorer to be able to see the uTorrent Folder Structure on the left, with the "New Downloads" folder selected, to see the torrent downloads on the right, when they are processed.
- The length of the uTorrent window should be as wide as possible without interfering with the folder view pane in the Explorer window. For the height, again do not let it extend into the "Log" window. Adjust the column width of the "Name" field, if needed, to be able to see the "ETA" field.
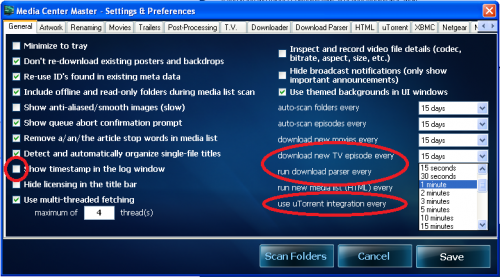
Step 3a - In the "General" tab settings, change the following time frames:
- "download new TV episodes every" - from 15 days to 1 minute.
- "run download parser every" - from 15 days to 5 minutes.
- "run uTorrent integration every" - from 15 days to 10 minutes.
- Tick the check box for "Show timestamp in the log window"
- At this point, if not already done so, it is suggested to jump to the next guide, "How to Interpret the First Run," to read and familiarize yourself with it, before continuing with Step 3b.
- The guide will go over the important processes to watch for in order to ensure a successful first run has been completed.
- The automation process for the selected TV Series will begin within one (1) minute after clicking on the save button.
- After clicking the save button,
- Remember to click the "Task" bar buttons in the following order:
- First, open the Explorer window, then
- Open uTorrent, so uTorrent will be on top of the Explorer window.
Step 3b - In the "General" tab settings... (continue using snap shot, above)
- Click the "Save" button to close the "Settings and Preferences" window, and to begin the first run of Media Center Master.
- Click the "Task" bar buttons to reopen the Explorer and uTorrent windows.
How to Interpret the First Run
- Do not use, this guide, unless, the user followed the Table of Contents, Section 2 - Installing Media Center Master with it's subsections, as a complete guide, without making any changes to the defined settings.
- Using these steps in any other manner will not reproduce what is shown in the examples.
- The following screen shots were chosen from a group of several test runs.
- This selective process was done to get a specific rendering of a test run; in order to follow one (1) of several downloads(*) through the complete process, and to provide for a short, but informative guide.
- The screen shots are taken in sequential real time order.
- Your results will vary depending on several issues, such as: popularity of the TV Series chosen, internet speed, time of day, torrent availability at fetcher sites, torrent swarm ratios...
- The test run, shown in the examples, updated and organized the TV Series with four (4) episodes, related meta-data, and image files in 21 minutes.
(*)The configured sittings used in these guides should download a minimum of one (1) episode up to a maximum of five (5) episodes.
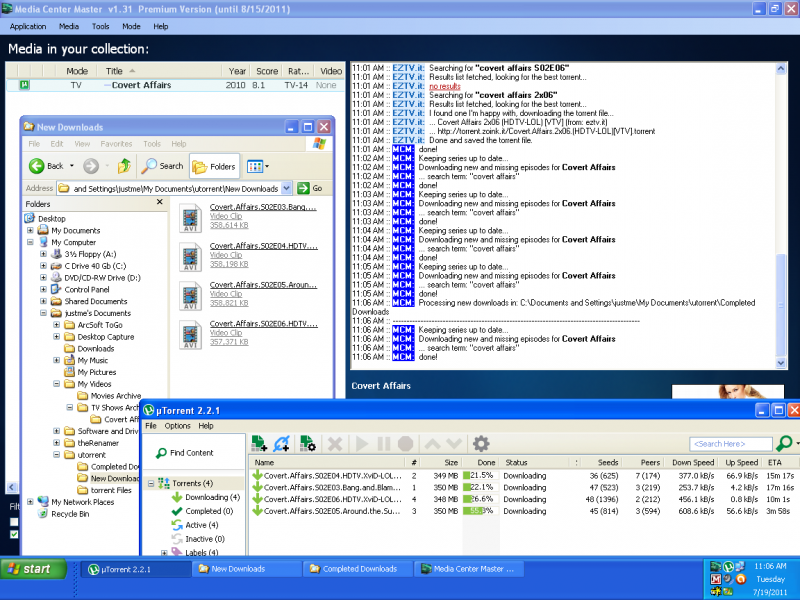
Step 1 - At 11:01 AM a record of events processed by Media Center Master is shown in the "Log" window with time stamps. According to the "Log", Media Center Master:
- Searched for new and missing episodes for "Covert Affair",
- Found four (4) torrents at the "EZTV.it" site
- Indicates in "red" there was "no results" during the search routine for episode 6 using the primary season/episode format (S02E06).
- Using a different format for season/episode (2x06), a torrent file was found and saved.
- Handed the .torrent files off to uTorrent for saving
- uTorrent processed the .torrent files and started downloading the torrent downloads into the "New Downloads" folder.

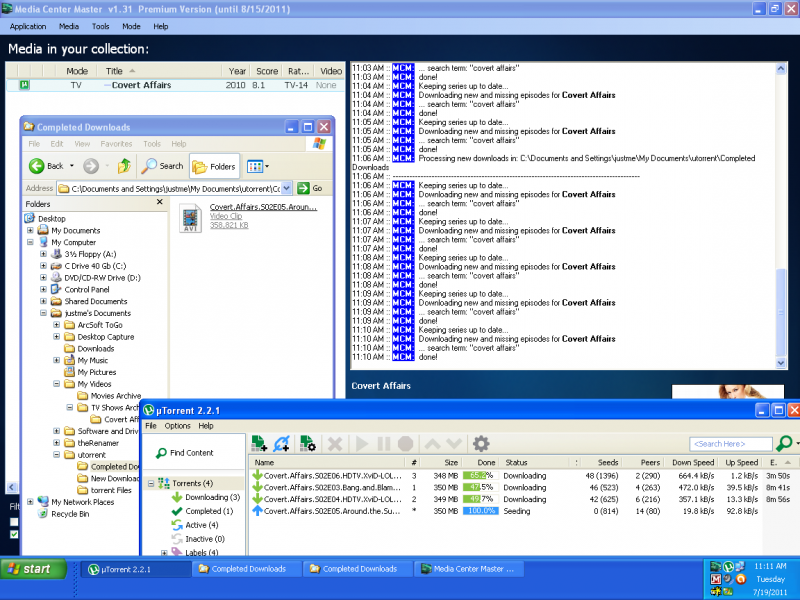
Step 2 - Media Center Master continues to log all process:
- In one (1) minute intervals it attempts to keep the series up to date. No other downloads are saved because it has recorded successful downloads in a meta-data file it uses for processing.
- At 11:06 AM, five (5) minutes after starting, it attempts to parse/process new downloads. Again, nothing is done because it does not find any completed downloads in the monitoring folder.
Step 3 - At 11:11 AM, computer time, the first download is completed in uTorrent and moved from the "New Downloads" folder to the "Competed Downloads" folder for processing.
- Notice, Media Center Master does not log the processes of uTorrent.
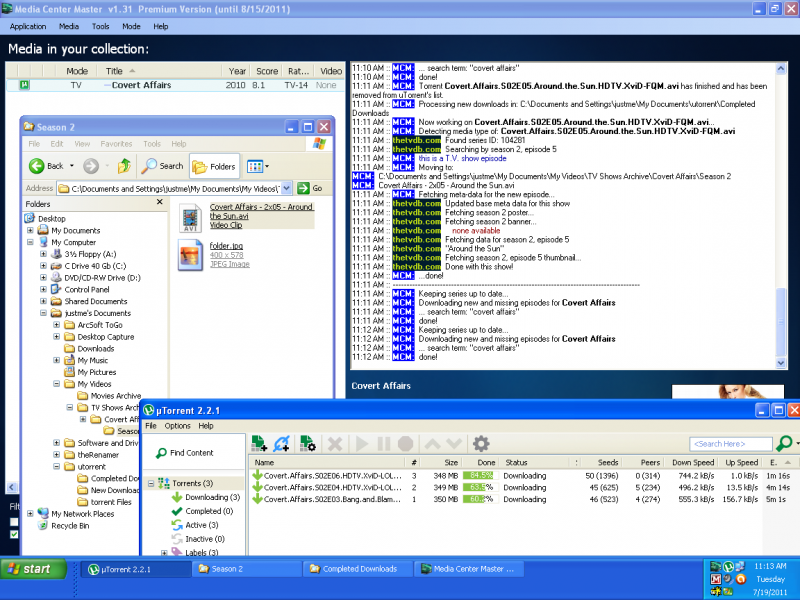
Step 4 - At 11:11 AM Media Center Master handles several process.
- Ten (10) minutes after starting, it uses the uTorrent integration feature and removes the first completed torrent in uTorrent.
- Second, five (5) minute interval, after starting, it parses/processes the completed download found in the monitoring folder.
- It renames the downloaded file, removing all torrent tags, and uses TV Series Name, a season/episode format, and includes episode title.
- Using the information it obtained in the renaming, it creates the Season 2 folder.
- It moves the renamed file from the uTorrent folder structure to the Season 2 folder.
- It fetches all associated meta-data, a poster, a thumbnail, and stored them in appropriate files and folders.
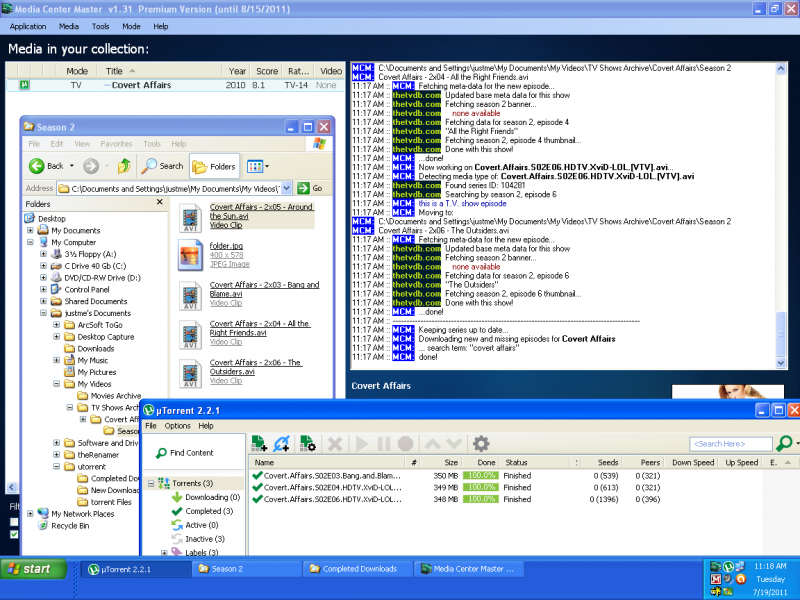
Step 5 - At 11:17 Media Center Master has completed parsing/processing the remaining three (3) downloads into the proper folders for the TV Series,
Step 6 - At 11:21 AM, second ten (10) minute interval for uTorrent integration processing.
- It is busy keeping TV Series up to date (timing slightly off because of meta-data, poster, and thumbnail downloading, and other internal processing)
- At 11:22 AM, 21 minutes after starting, it removes the remaining three (3) completed torrents in uTorrent.
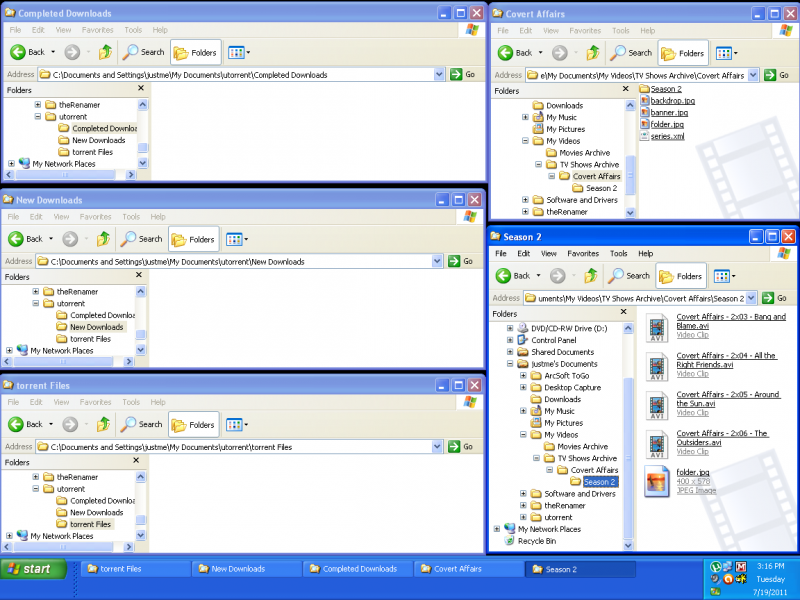
Step 7 - The first run is complete.
- There are no files left in the uTorrent "Folder Structure."
- The .torrent file (control file), saved into this folder by Media Center Master was deleted, after being read by uTorrent.(1)
- All of the video downloads were individual files.(2)(3)
- There is no clean up, maintenance to be preform after the completion of the test run.
- These files were obtained by uTorrent with information from the .torrent file, and
- Saved into the "New Downloads" folder,
- Upon completion the downloads were moved into the "Completed Downloads" folder, then
- Media Center Master moved them into the "TV Shows Archive" folder structure.
- The New TV Series is up to date.(4)
- A numbered "Season" folder was created for the renamed video downloads,
- The renamed video downloads were moved into the "Season" folder and
- An image file relating to the season was found, downloaded and moved into the "Season" folder.
(1) - The settings used for the first run were selected to reduce the number of steps in these guides, thereby removing additional confusion, and to provide an example of an automated process with no requirements to preform maintenance afterwards, by deleting the .torrent files after the downloads are loaded. Should a user wish to store and/or move the .torrent files for future use: (an) additional folder/s would need to be created in the guide, "How to Set-Up a Folder Structure for uTorrent" (e.g., "Stored Torrents," "Moved Finished Jobs"), to store these files; additional steps to set the location/s would be needed in the guide, "How to Specify Locations to the uTorrent Folder Structure," after Step 4; and the option which enabled "Delete loaded .torrents," in Step 5, would need to be disabled by removing it's check mark.
(2) - The settings used for the first run were selected to reduce any possible problems by not using a new "Beta" feature. There should be no folders downloaded containing a video in an archived (e.g., .rar) format, because the setting for "Allow torrents with archived files" option, shown in Step 2a of the guide, "How to Configure the Downloader Tab Settings," was not enabled. For advance users wishing to include archived files in the downloads, this option would need to be enabled. The user would, also, be required to un-archive the files and remove all of the archived files and it's folder, manually, or, enable the "Beta" features for: "Attempt to extract from archives (please report problems at the forums!) BETA!", and "Automatically clean-up folders left behind by T.V. downloads (if no video files or archives exits) BETA!," shown in the guide, "How to Configure the Settings for Transparent Effect."
(3) - The settings used for the first run were selected to reduce any possible problems by not using a new "Beta" feature. At times a folder will be downloaded containing the video and also include some other miscellaneous folders and/or files related to the video, or the torrent download. The video file will be processed/parsed and moved into the "TV Shows Archive" and the downloaded folder with all of its remaining content is left untouched, requiring clean-up by the user. The second "Beta" feature, "Automatically clean-up folders left behind by T.V. downloads (if no video files or archives exits) BETA!," shown in the guide, "How to Configure the Settings for Transparent Effect," can be enabled for users wishing to test it. Note this feature is only available for T.V. downloads.
(4) - Not shown in the examples is the hidden "metadata" folder. It contains the meta-data and image files for the related video downloads.
Step 8 - To test a full automated run from boot up,
- Go back to the "How to Add a New TV Series" guide and select a different show.
- Exit the program through Application>Exit, then reboot.
- After rebooting, Media Center Master should open, then
- One (1) minute after building and refreshing the cache
- The automated processing will start.
Technical Guides to Features
Fetch Meta-Data
How To Fetch Meta Data
If you just want to fetch meta-data for a single title in your media list, simply right-click on the title from Media Center Master and choose "Fetch meta data". This will activate Media Center Master's configured meta fetcher sources to search for and download related meta data (including text, images, etc.) for the selected title.Depending on a few possible scenarios, the following will happen:
- If there is no existing meta data for the title (or existing data does not contain proper media IDs), then Media Center Master will begin a Fresh Meta-Data Search on this title.
- If there is existing meta data for the title, but the option under "Application" -> "Main preferences..." -> "Advanced" -> "Re-use ID's found in existing meta data" is not checked, then Media Center Master will begin a Fresh Meta-Data Search on this title.
- If there is existing meta data for the title and the option under "Application" -> "Main preferences..." -> "Advanced" -> "Re-use ID's found in existing meta data" is checked, then Media Center Master will begin an Update Meta-Data Fetch on this title.
Fresh Meta-Data Search
The folder that contains the title you are fetching meta data for is run through a quick process that cleans up the formatting and prepares it for searching. This process removes some stop-words such as 'the' and 'and' as well as replaces punctuation with spaces as appropriate (non-exhaustive list). Doing this provides the fetchers with an appropriate title (and potentially a release year) to search against.However, if this search:
- the option under "Application" -> "Main preferences..." -> "Advanced" -> "Respect the ForcedTitle XML tag in meta data" is checked
- and is a movie title (not T.V. or adult
- and has existing meta data
- and that meta-data contains a ForcedTitle tag
- then the title to search against will be set to the data in the ForcedTitle tag
Next, configured meta-data fetchers (listed in "Application" -> "Manage fetchers and plugins...") are given the the title to search for (as indicated above) and a release year (if one is available from parsing the title's text). The list of potential matches retrieved from the fetcher should be displayed in the log window to the right-hand side of Media Center Master during this time. After they have been retrieved, Media Center Master eliminate any matches that do not pass a title comparison check1. Depending on how the remaining list of results look, Media Center Master will then do the following:
- If there are no results, this fetcher is skipped and the next is used (if more than one is available). If there continues to be no results, the fetch is aborted. Aborted fetches can still produce blank meta data if the option under "Application" -> "Main preferences..." -> "Advanced" -> "Create blank meta data if no results were found" is checked.
- If there is exactly one result from the fetcher and the option under "Application" -> "Main preferences..." -> "Confirm search results" is not checked, then the most likely title will be selected automatically as the confirmed result.
- If there is exactly one result from the fetcher and the option under "Application" -> "Main preferences..." -> "Confirm search results" is checked and the option under under "Application" -> "Main preferences..." -> "Confirm search results" -> "Unless there is only one result" is not checked, then a prompt will come up asking you to confirm the most likely result. If it's not the result you want, you can click "No" to cycle to the next.2
- If there is exactly one result from the fetcher and the option under "Application" -> "Main preferences..." -> "Confirm search results" is checked and the option under under "Application" -> "Main preferences..." -> "Confirm search results" -> "Unless there is only one result" is checked, then the most likely title will be selected automatically as the confirmed result.
- If there are multiple results from the fetcher and the option under "Application" -> "Main preferences..." -> "Confirm search results" is not checked, then the most likely title will be selected automatically as the confirmed result.
- If there is exactly one result from the fetcher and the option under "Application" -> "Main preferences..." -> "Confirm search results" is checked, then a prompt will come up asking you to confirm the most likely result. If it's not the result you want, you can click "No" to cycle to the next.
If a prompt appears asking for confirmation and none of the results are ultimately selected, then the fetch is aborted. Aborted fetches can still produce blank meta data if the option under "Application" -> "Main preferences..." -> "Advanced" -> "Create blank meta data if no results were found" is checked.
The meta data fetch process continues from here as an Update Meta-Data Fetch.
Update Meta-Data Fetch
Using the meta data from the selected fetcher result, a meta-data file is created (if one already existed, it will be overwritten entirely at this point).
Preparing for a Fresh Re-install of Media Center Master
- Deciding whether to, just, uninstall the Media Center Master program, or completely remove Media Center Master and all associated files, is the first step to resolving an issue.
- The user should be reminded, Media Center Master is, also, dependent on outside folder locations and another program.
- The second step is to determine, whether or not, these other areas require any attention before re-installing Media Center Master.
How to Remove Media Center Master for a Fresh Re-Install
Following all of the guides in this section will completely remove Media Center Master from your system, including all user settings, download history files, media collection cache files, and registry entry.
- Screen shot examples are taken from a Windows XP Operating System.
- Where major differences between operating systems occur; screen shots from a Windows 7 Operating System are, also, included.
How to Run Media Center Master Uninstaller
The uninstaller:
- Will not remove:
- The user's configuration settings made to the Application>Settings and Preferences window and stored in the registry,
- The user's TV Series/Movies download history files, or
- The user's media collection cache file.
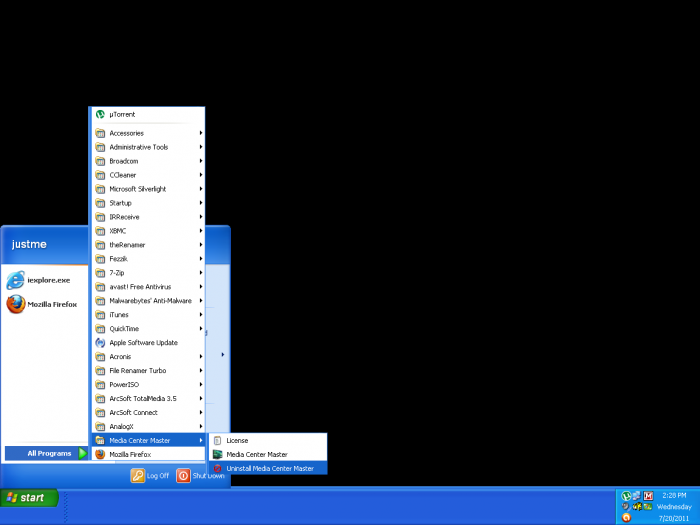
The Media Center Master uninstaller can be found through Start>All Programs>Media Center Master>Uninstall Media Center Master.
- For most users the uninstall is straightforward.
- Run the program and click the "Yes" button to begin.
- When it is finish, click the "OK" button.
- Should the uninstaller experience an unexpected error and not complete, jump to:
- "Manually uninstalling Media Center Master" guide.
How to Manually Uninstall Media Center Master
- This guide, only, needs to be used when a user experiences an unexpected error during an:
- Install,
- Uninstall,
- Re-install, or...
- *And is unable to complete an:
- *Uninstall, or
- *A fresh, re-install.
The uninstaller:
- Should remove:
- The Media Center Master program files,
- The hidden "bin" folder, and
- The Start>All Programs group entries
Step 1 - Locate the Media Center Master program folder.
- On most Windows Operating Systems, the folder will be found here:
- C:\Program Files\Media Center Master
- For some 64 bit Windows Operating Systems, the folder will be found here:
- C:\Program Files (x86)\Media Center Master
- Left click on the folder to highlight, then select delete from the menu.
Step 2 - Locate the hidden "bin" folder.
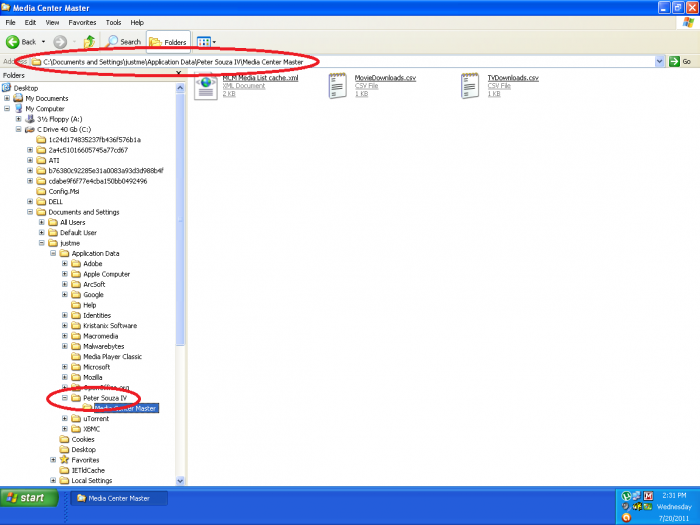
- For Windows XP Operating Systems, the folder will be found here:
- C:\Documents and Setting\"user name"(1)\%Application Data%(2)\Peter Souza IV\Media Center Master\bin
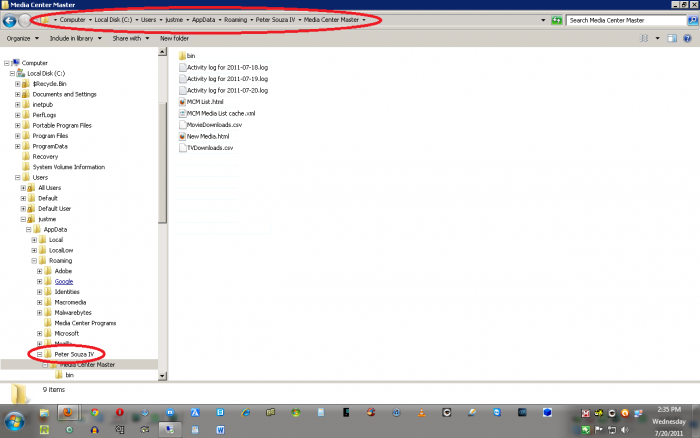
- For Windows 7 and Vista Operating Systems, the folder will be found here:
- C:\Users\"users name"\%AppData%(1)\Roaming\Peter Souza IV\Media Center Master\bin
- Left click on the folder to highlight, then select delete from the menu.
Step 3 - Locate the Media Center Master Start entry here:
- Start>All Programs>Media Center Master
- Left click on the entry to highlight, then select delete from the menu.
Step 4 - Close any programs that are open and reboot the system.
(1) - actual user's name, without quotes.
(2) - this is a hidden folder.
How to Change the Folder Options in Order to View Hidden Files/Folders
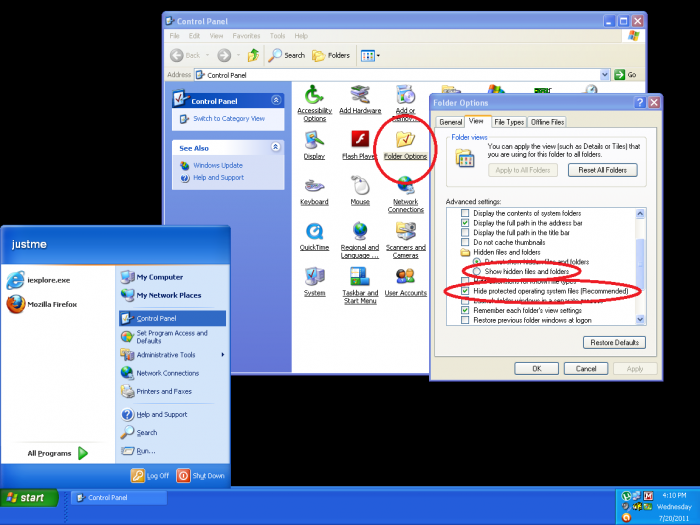
The "Folder Options" window can be found through Start>Control Panel>Folder Options. Click on the "View", scroll down to "Hidden files and folders.
- Tick the radio button for "Show hidden files and folders."
- Tick the check box to remove the check for "Hide protected operating system files (Recommended)"
- Click the "OK" button to finish.
How to Remove Hidden Files/Folders
The location of hidden user folders and files are dependent upon the Windows Operating System used.
Windows XP Users
- See, Section 4.1.2, "Changing the Folder Options in Order to View Hidden Files/Folders" to change settings for viewing hidden folders and files.
- Be sure to go back and change the settings to the "Folder Options - View" tab after completing this step.
Delete the "Peter Souza IV" folder located through C:\Documents and Setting\"user name"\Application Data\
Windows 7 and Vista Users
- See, Section 4.1.2, "Changing the Folder Options in Order to View Hidden Files/Folders" to change settings for viewing hidden folders and files.
- Be sure to go back and change the settings to the "Folder Options - View" tab after completing this step.
Delete the "Peter Souza IV" folder located through C:\Users\"users name"\AppData\Roaming\
How to Remove Registry Entries
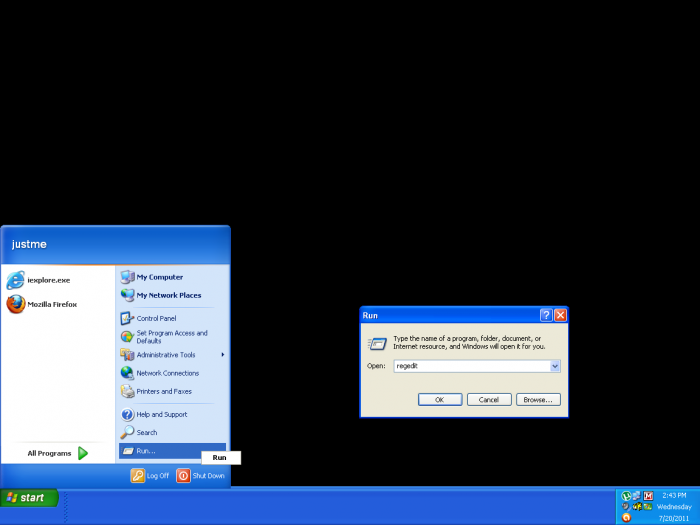
Step 1 - Open the Registry Editor through Start>Run, type in "regedit" (without quote marks) and click the "OK" button.
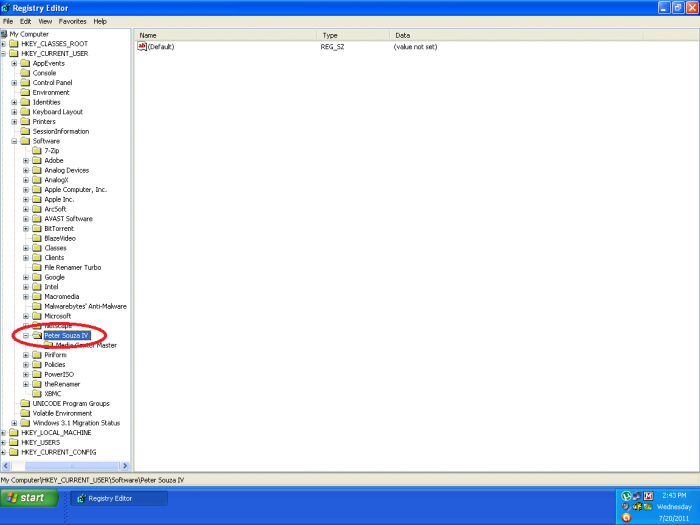
Step 2 - Delete the "Peter Souza IV" entry located through My Computer>HKEY_CURRENT_USER>Software
- Reboot the system to save the change in the registry files.
Additional Areas to Check Before Doing a Fresh Re-Install
These are user based actions, and mentioned here, only, for a reminder. No other information is provided.Depending on the reason/s for the uninstall of Media Center Master, some additional clean-up may be necessary in one or more of the following:
- The Media Collection Archive folders,
- The uTorrent Program,
- The uTorrent Folder Structure.
Consult the User's Guide for information on using the wiki software.


