Difference between revisions of "Preliminary Installation Guides"
| Line 8: | Line 8: | ||
</blockquote></blockquote></blockquote> | </blockquote></blockquote></blockquote> | ||
| − | [[Main_Page#Media Center Master Reference Guide|Back to | + | [[Main_Page#Media Center Master Reference Guide|Back to Media Center Master Reference Guide - Contents]] |
==How to Set-Up a Folder Structure for Media Center Master== | ==How to Set-Up a Folder Structure for Media Center Master== | ||
Revision as of 14:59, 6 August 2011
The intended purpose of this section is for it to be used as a complete manual for a first time installation of Media Center Master. Starting with the "Installation Notes" and finishing with a successful first run.
- Screen shot examples are taken from a Windows XP Operating System.
- Where major differences between operating systems occur; examples from a Windows 7 Operating System are included.
Back to Media Center Master Reference Guide - Contents
Contents
How to Set-Up a Folder Structure for Media Center Master
How to Set-Up a Folder Structure for Media Center Master
How to Set-Up a Folder Structure for uTorrent
How to Set-Up a Folder Structure for uTorrent
How to Install uTorrent
***** Disclaimer -- read this before using Torrent Downloader *****
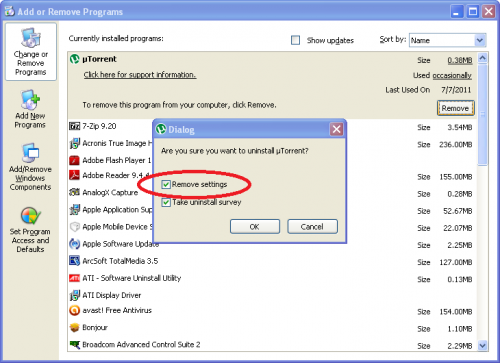
For users who have a current instance of uTorrent installed, and intends to use the Preliminary Installation Guides with the existing uTorrent Program, there will not be any trouble shooting information for errors in these guides, should they occur. The instance of uTorrent for Media Center Master is for automation, it is therefore suggested that the user uninstall uTorrent, through the Control Panel, remembering to tick the optional check box to, also, remove the user settings during the uninstall process, then reinstall uTorrent using the Preliminary Installation Guides. If the option, in the example below, is missed during an uninstall, simply reinstall uTorrent, then uninstall it again. There is no need to reboot the system.
This does not mean: "uTorrent can not also be used for manual downloads of TV Series/Movies and other items, at the same time with Media Center Master." It is a suggestion that the automation process should come as a priority over manual downloading. If a user intends to use this instance of uTorrent for Media Center Master along with manual downloads of TV Series/Movies, other items, the user should make additional changes after Media Center Master is installed, set-up, configured, and has completed a first run of Media Center Master with satisfactory results.
- uTorrent v1.8 - v3.0.0 have been tested and working correctly with these guides.
- Downloads for these versions may be found at either of these sites: uTorrent Site Old Apps Site
- New users not familiar with "BitTorrents," may wish to watch the short video, titled, "BitTorrent, Explained", found through the "See how it works" link, located just below the "Free Download for Windows" link, at the uTorrent Site.
- uTorrent v2.2.1 is used for the examples in these guides.
These guides are written with the intent of uTorrent to be installed on the system hard drive (C:\) in the same computer Media Center Master is installed on.
- The set-ups and installations of the different versions of uTorrent, as a whole, are much the same in each version.
- All of the default ticks, options, can be used with Media Center Master.
- There are however two possible exceptions, depending on which version is chosen for installation.
- The user should make an informed choice regarding extra downloads of files/software to the system by accidentally missing the options (shown below), by systematically clicking on "Next."
During the uTorrent install watch for the following two (2) options:
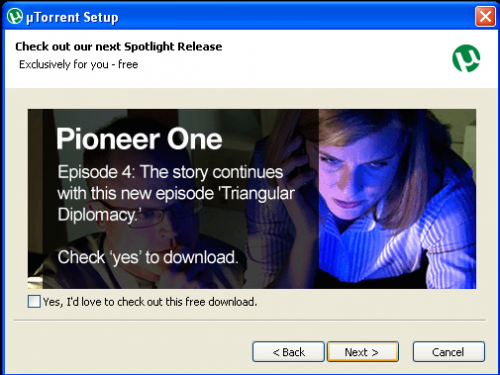
1st Option - uTorrent’s Featured Spotlight Release Download, shown below. After choosing, click next.
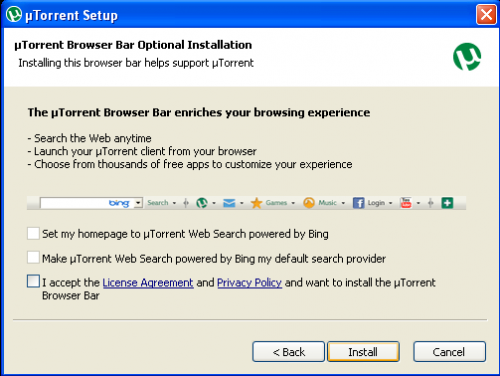
2nd Option - uTorrent’s Browser Bar Optional Installations, shown below. Make appropriate choices, then click Install.
How to Customize uTorrent for Media Center Master
How to Customize uTorrent for Media Center Master
***** Disclaimer -- read this before using Torrent Downloader *****
For users who have a current instance of uTorrent installed, and intends to use the Preliminary Installation Guides with the existing uTorrent Program, there will not be any trouble shooting information for errors in these guides, should they occur. The instance of uTorrent for Media Center Master is for automation, it is therefore suggested that the user uninstall uTorrent, through the Control Panel, remembering to tick the optional check box to, also, remove the user settings during the uninstall process, then reinstall uTorrent using the Preliminary Installation Guides. If the option, in the example below, is missed during an uninstall, simply reinstall uTorrent, then uninstall it again. There is no need to reboot the system.
This does not mean: "uTorrent can not also be used for manual downloads of TV Series/Movies and other items, at the same time with Media Center Master." It is a suggestion that the automation process should come as a priority over manual downloading. If a user intends to use this instance of uTorrent for Media Center Master along with manual downloads of TV Series/Movies, other items, the user should make additional changes after Media Center Master is installed, set-up, configured, and has completed a first run of Media Center Master with satisfactory results.
The customized settings shown will not provide any “tweaks” - change the download/upload speeds, caps, queuing, scheduling …
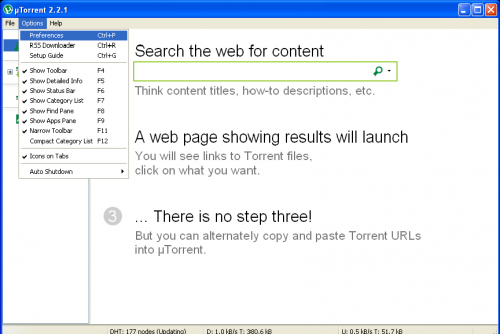
Open the preferences window thru the "Options" menu.
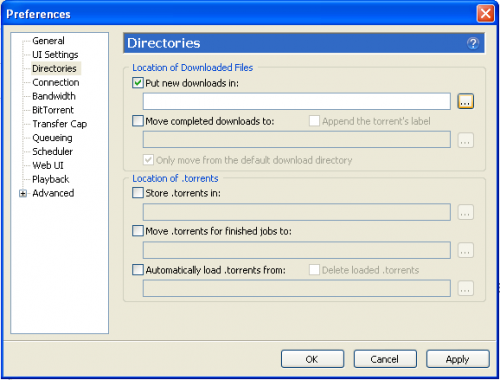
How to Specify Locations to the uTorrent Folder Structure
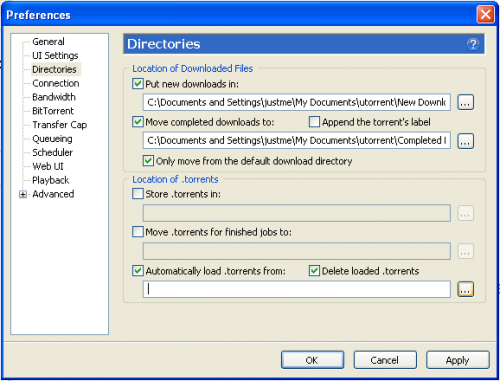
The “New Downloads” folder is where uTorrent will store New TV Series Episode files while they are being downloaded.
Step 1 - Click on “Directories” in the left menu,
- Tick the check box for “Put new downloads in:,” then
- Click the browse button “…”
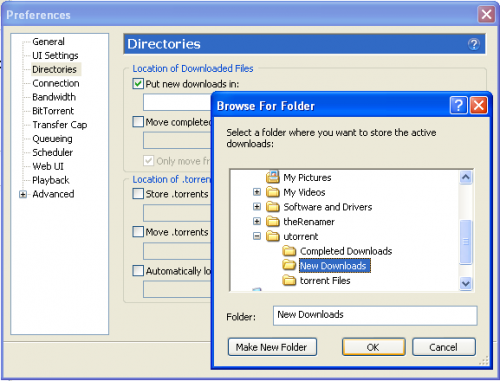
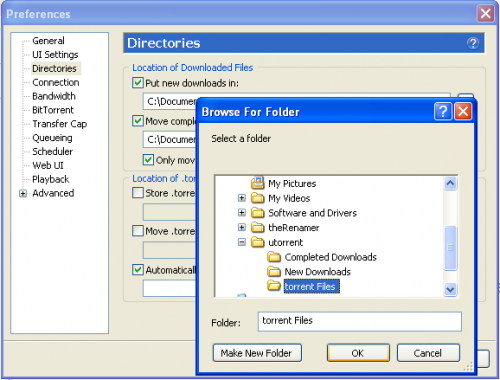
Step 2 - Browse to your Dedicated Folder Structure you created for uTorrent.
- Click on the “New Downloads Folder”, then
- Click the “OK” Button.
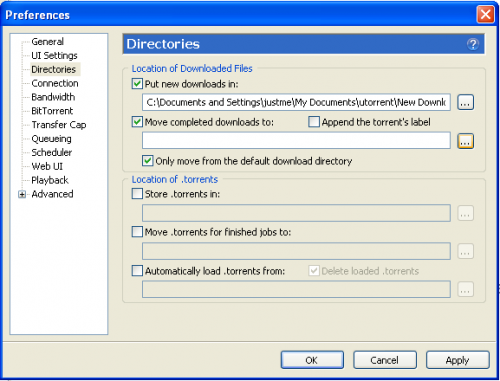
After a new download is complete, uTorrent will move the completed download to the “Completed Downloads” folder. It is at this location where Media Center Master will pick it up and process the completed TV Series Episode for archiving.
Step 3 - Tick the check box for “Move completed downloads to:,” then
- Click the browse button “…”
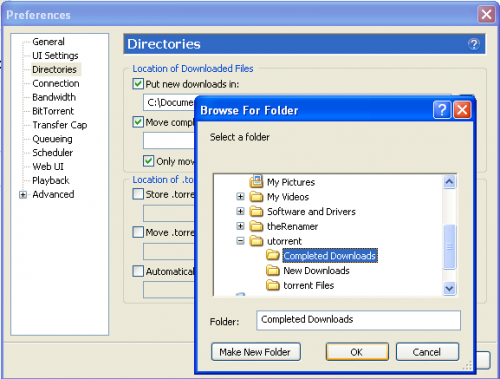
Step 4 - Browse to your Dedicated Folder Structure you created for uTorrent.
- Click on the “Completed Downloads Folder”, then
- Click the “OK” Button.
The “torrent files” Folder is for a .torrent file used for downloading a TV Series episode. It is a control file uTorrent needs to gather all the pieces of a file to reassemble it back together. This is the location Media Center Master will save fetched .torrent files to. After the .torrent file has been read, it will be deleted.
Step 5 - There are two (2) boxes to tick here,
- “Automatically load .torrent from:,” and
- “Delete loaded .torrents,” then
- Click the browse button “…”
Step 6 - Browse to your Dedicated Folder Structure you created for uTorrent.
- Click on the “torrent Files Folder”, then
- Click the “OK” Button.
How to Configure Settings for Transparent Effect
These settings, provide the transparent effect that allows uTorrent to seamlessly work with Media Center Master.
How to Disable Pop-up Windows
- This is the first step of three part outlined process to configuring settings for the transparent effect.
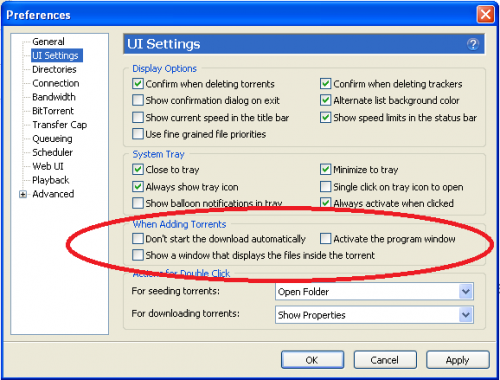
- By disabling these options, the torrent will start downloading automatically and no pop-up windows will appear requiring user acknowledgements.
Click on “UI Settings” in the left menu,
- The default set-up settings for the section, “When Adding Torrents”
- Should have two (2) check marks in the check boxes for:
- "Activate the program window", and
- "Show a window that displays the files inside the torrent"
- Tick both check boxes to remove the check marks.
- If there is a check mark in the check box for:
- "Don't start the download automatically"
- Tick the check box to remove it.
- All three (3) check boxes should be empty.
How to Disable Seeding of Completed Downloads
- This is the second step of three part outlined process to configuring settings for the transparent effect.
- A completed download can not be renamed and moved into the TV Series Archive by Media Center Master, if it is in use by uTorrent for seeding.
This step will only stop torrents from seeding after a download has completed, and will not affect the torrent download speed.
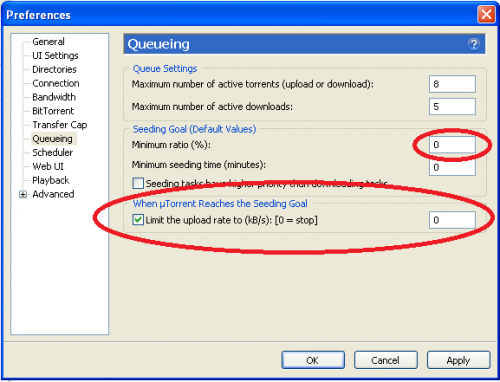
Click on “Queueing” in the left menu.
- Change the “Minimum ratio (%) value to
- "0" (do not enter quotes).
- Tick the check box for “When uTorrent reaches the Seeding Goal”, then
- Change the value to
- "0" (do not enter quotes).
How to Enable the Web User Interface of uTorrent
***** Disclaimer -- read this before using Torrent Downloader *****
- The username will remain visible, if it is forgotten.
- The password will be hidden at the time of typing it in, and will remain hidden.
- Be sure to write the password down and save it in a safe location.
- This password will be required to configure Media Center Master in another guide.
For uTorrent v1.8 - v2.2.1 users, continue with Step 1a.
For uTorrent v3.0.0 users, continue with Step 1b.
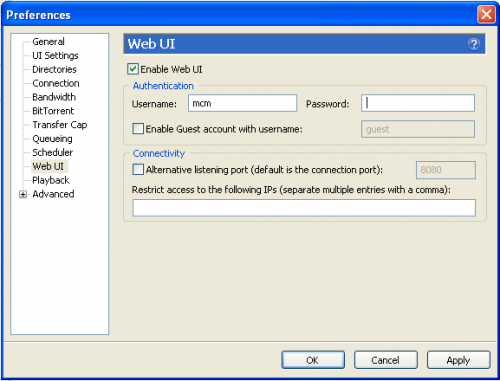
Step 1a - For uTorrent v1.8 - v2.2.1 users, click on “Web UI” in the left menu.
- Tick the check box for “Enable Web UI,”
- Enter a Username and
- Password
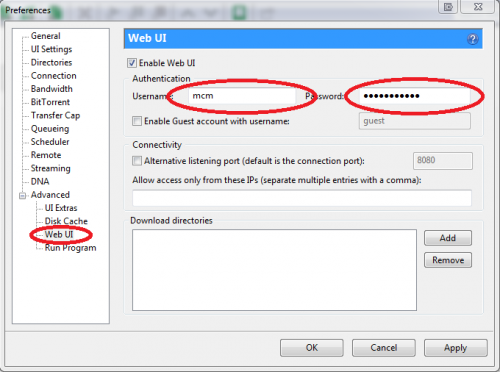
Step 1b - For uTorrent v3.0.0 users, expand the "Advanced" listing in the list to the left,
- Select "Web UI", then do the following:
- Tick the check box for “Enable Web UI,”
- Enter a Username and
- Password
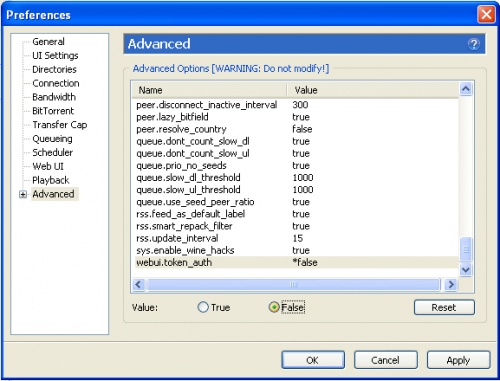
Step 2 - Applies to all uTorrent versions, click on “Advanced” in the left menu.
- Scroll down to the bottom of the list on the right side and
- Click on “webui.token_auth,”
- Tick the radio button for “False,” then
- Click the “OK” Button to complete the custom settings for uTorrent.
Exit the uTorrent Program to save your settings.
Step 3 - Close out the uTorrent Application Window.
- Click on red “X” at the top right of your screen,
- Exit the uTorrent Program
-
- Bottom right of your screen, then
- Click on “exit” in the pop-up menu.
How to Check Your System for the Microsoft .Net Framework 3.5 with SP1 Update
How to Check Your System for the Microsoft .Net Framework 3.5 with SP1 Update
Step 1 - The easiest way to find out if the Microsoft .Net Framework 3.5 with SP1 update is required:
- The download link is located at the bottom of their page.
- Some key features of the ASoft .NET Version Detector are:
- It is a lightweight tool.
- Non-installing - no need to remove it through the control panel.
- Just delete the file, if saved, for clean-up.
- With a Zip Utility installed, it is not necessary to save the file.
- Just open the file link, and double click the "dotnet.exe" file in the Zip Utility Application, when it pops up.
Step 2 - Look for the ".NET FW 3.5 SP1" in the list at the bottom of the detector application's "blue" window.
- If the ".NET FW 3.5 SP1" is in the list, continue to the next guide, "How to Install Media Center Master.
- If the ".NET FW 3.5 SP1" is not in the list, locate and click the green download button to the left of Microsoft .Net 3.5 Service Pack 1.
- Follow the link and instructions to download and install the Microsoft .Net 3.5 Framework with Service Pack 1.
Step 3 - To verify it installed correctly:
- Bookmark this page, so you may return to it after rebooting.
- Reboot the system.
- Return to this page.
- Repeat Steps 1 and 2.


